This guide is free. It takes you from bare hardware to an installed Ubuntu 22.04 Server — the base a Vast.ai host runs on. We cover writing the USB stick, BIOS settings and every installer screen. Disk partitioning gets its own detailed part: get it right the first time, because redoing it means reinstalling.
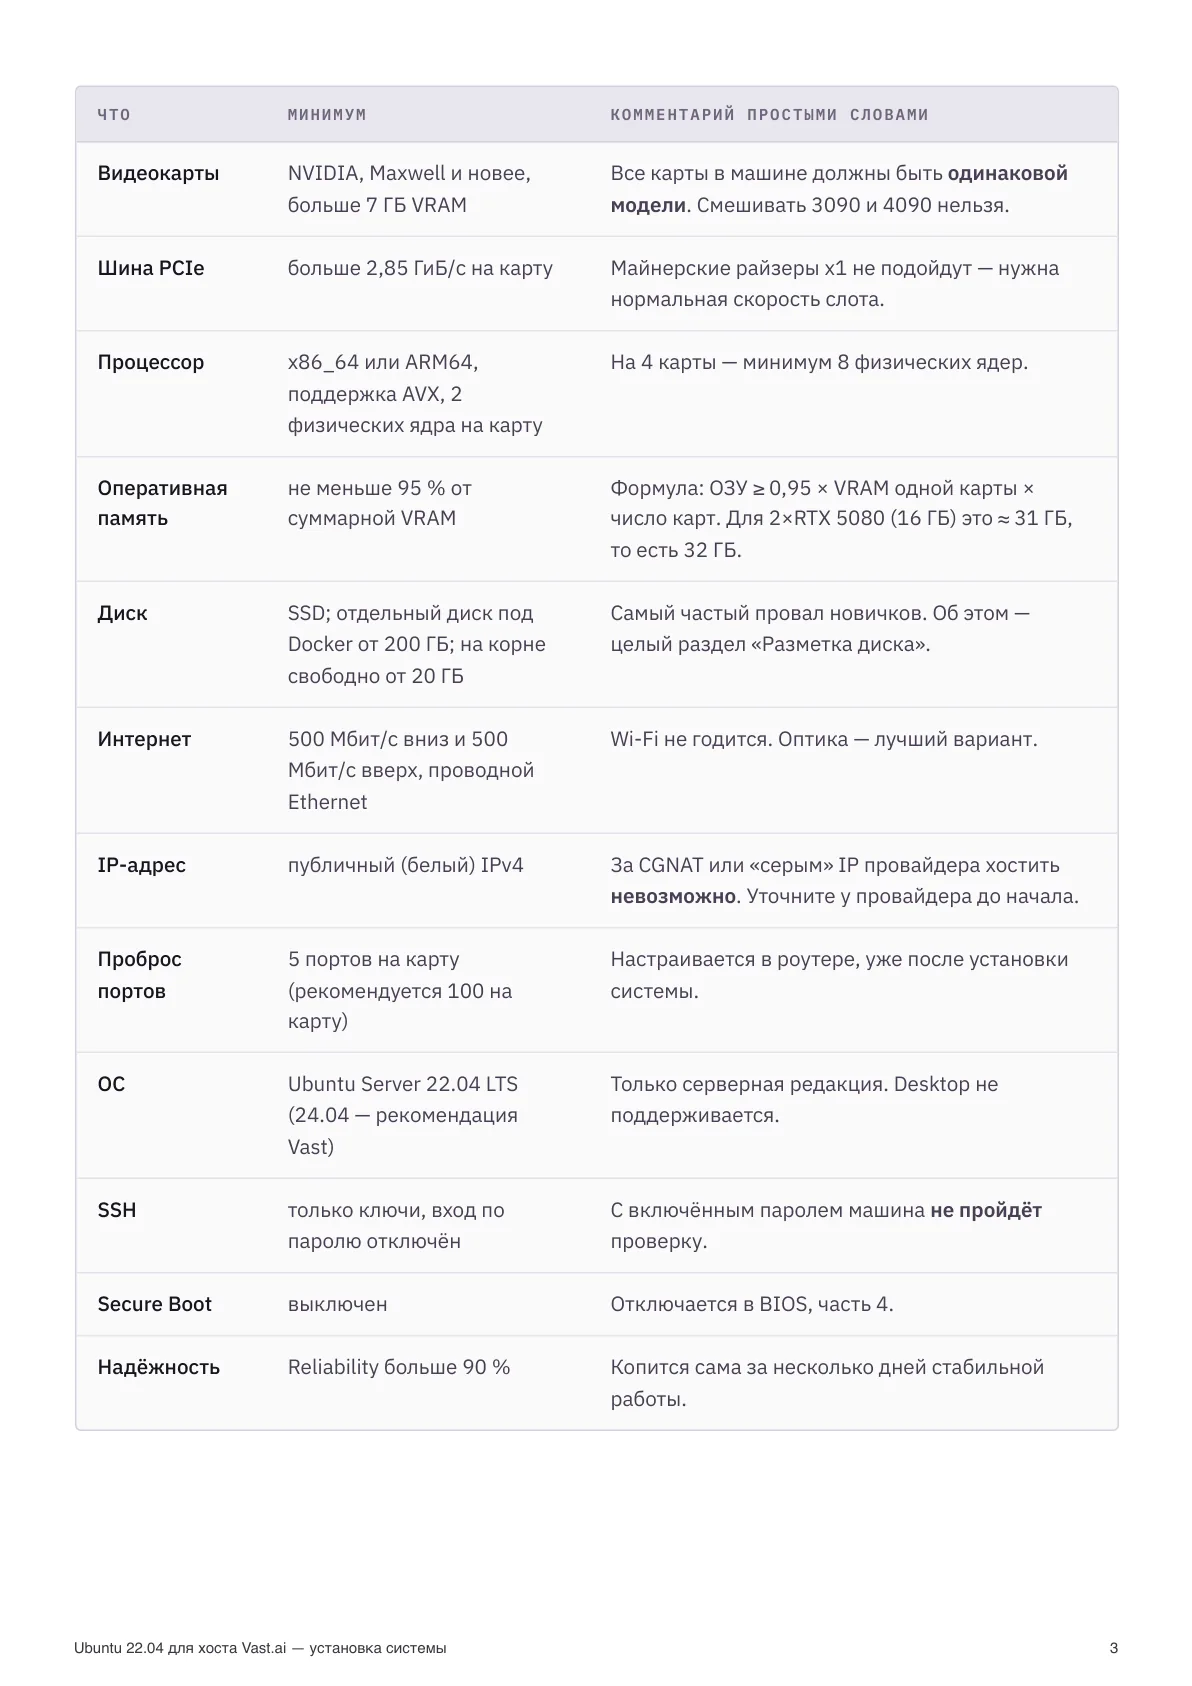
Vast.ai minimum requirements
Check this before buying anything. If the hardware or network is below the minimum, the machine won't get Verified — and without that almost nobody rents it.
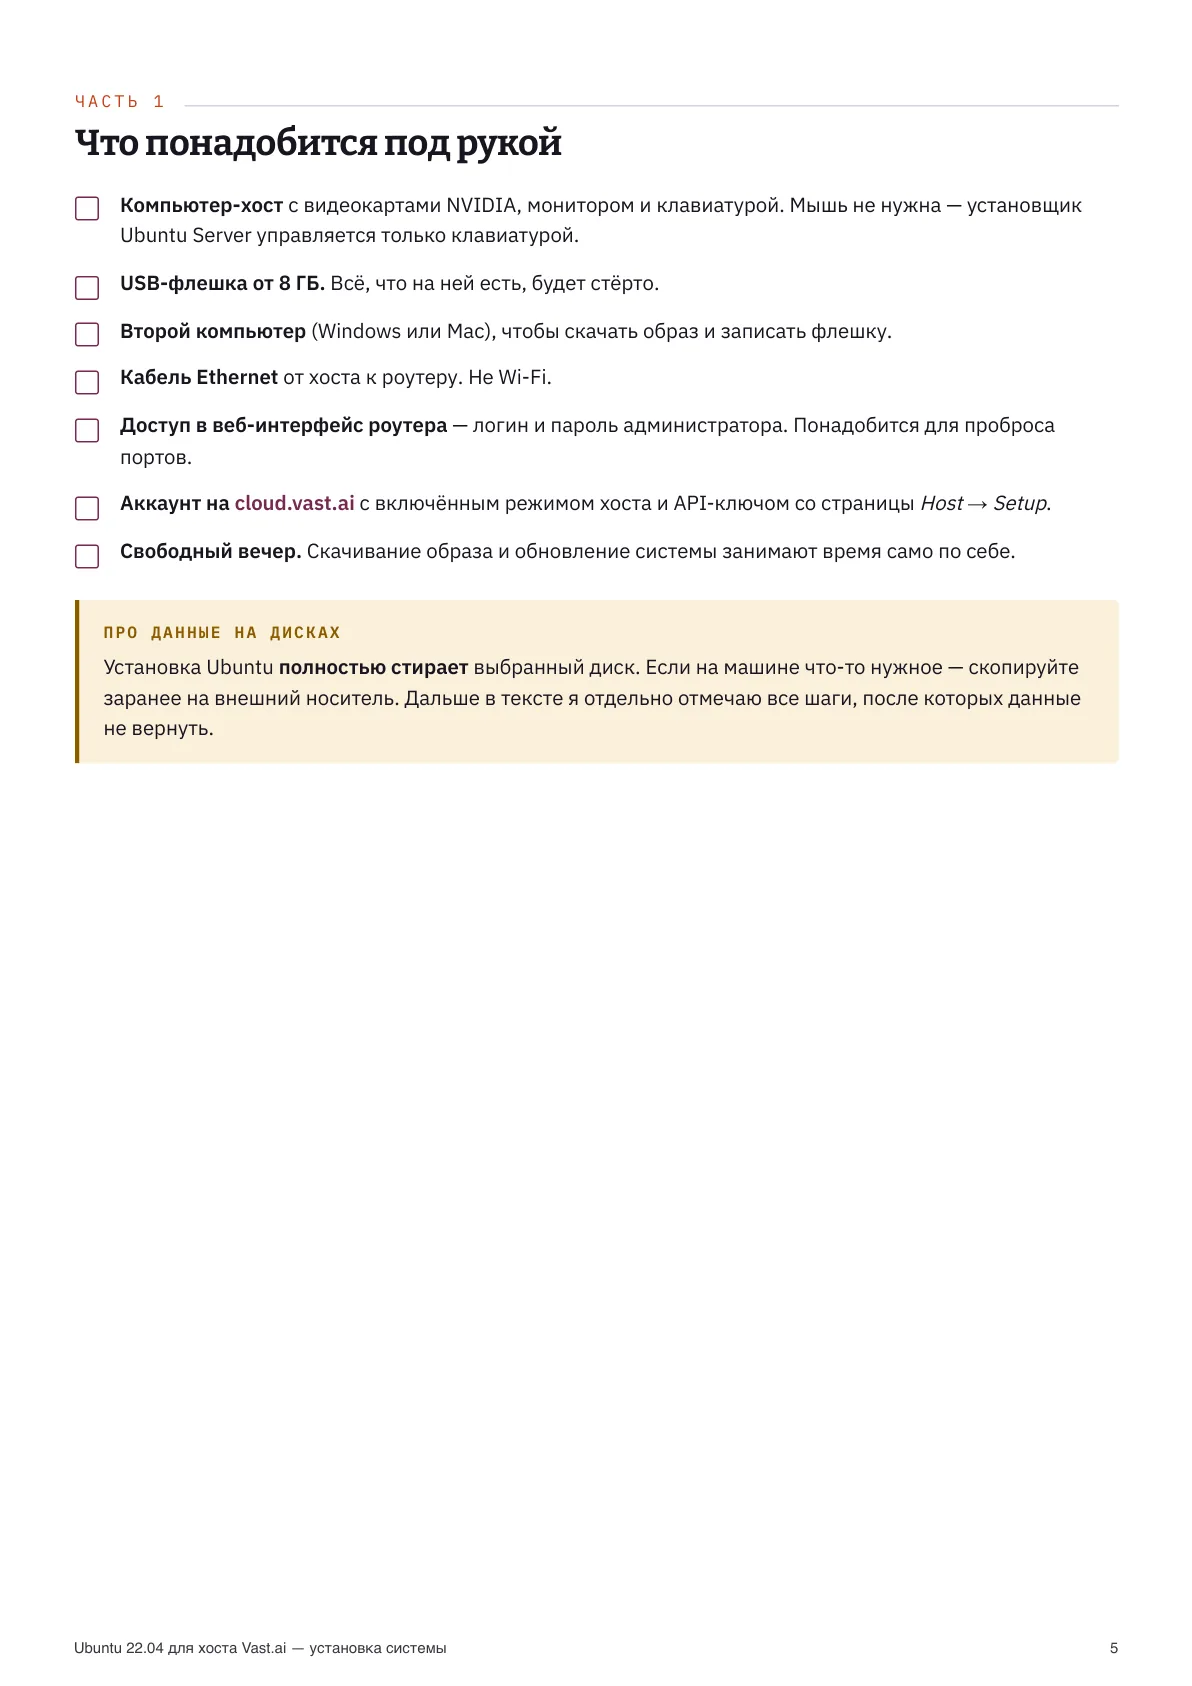
What to have on hand
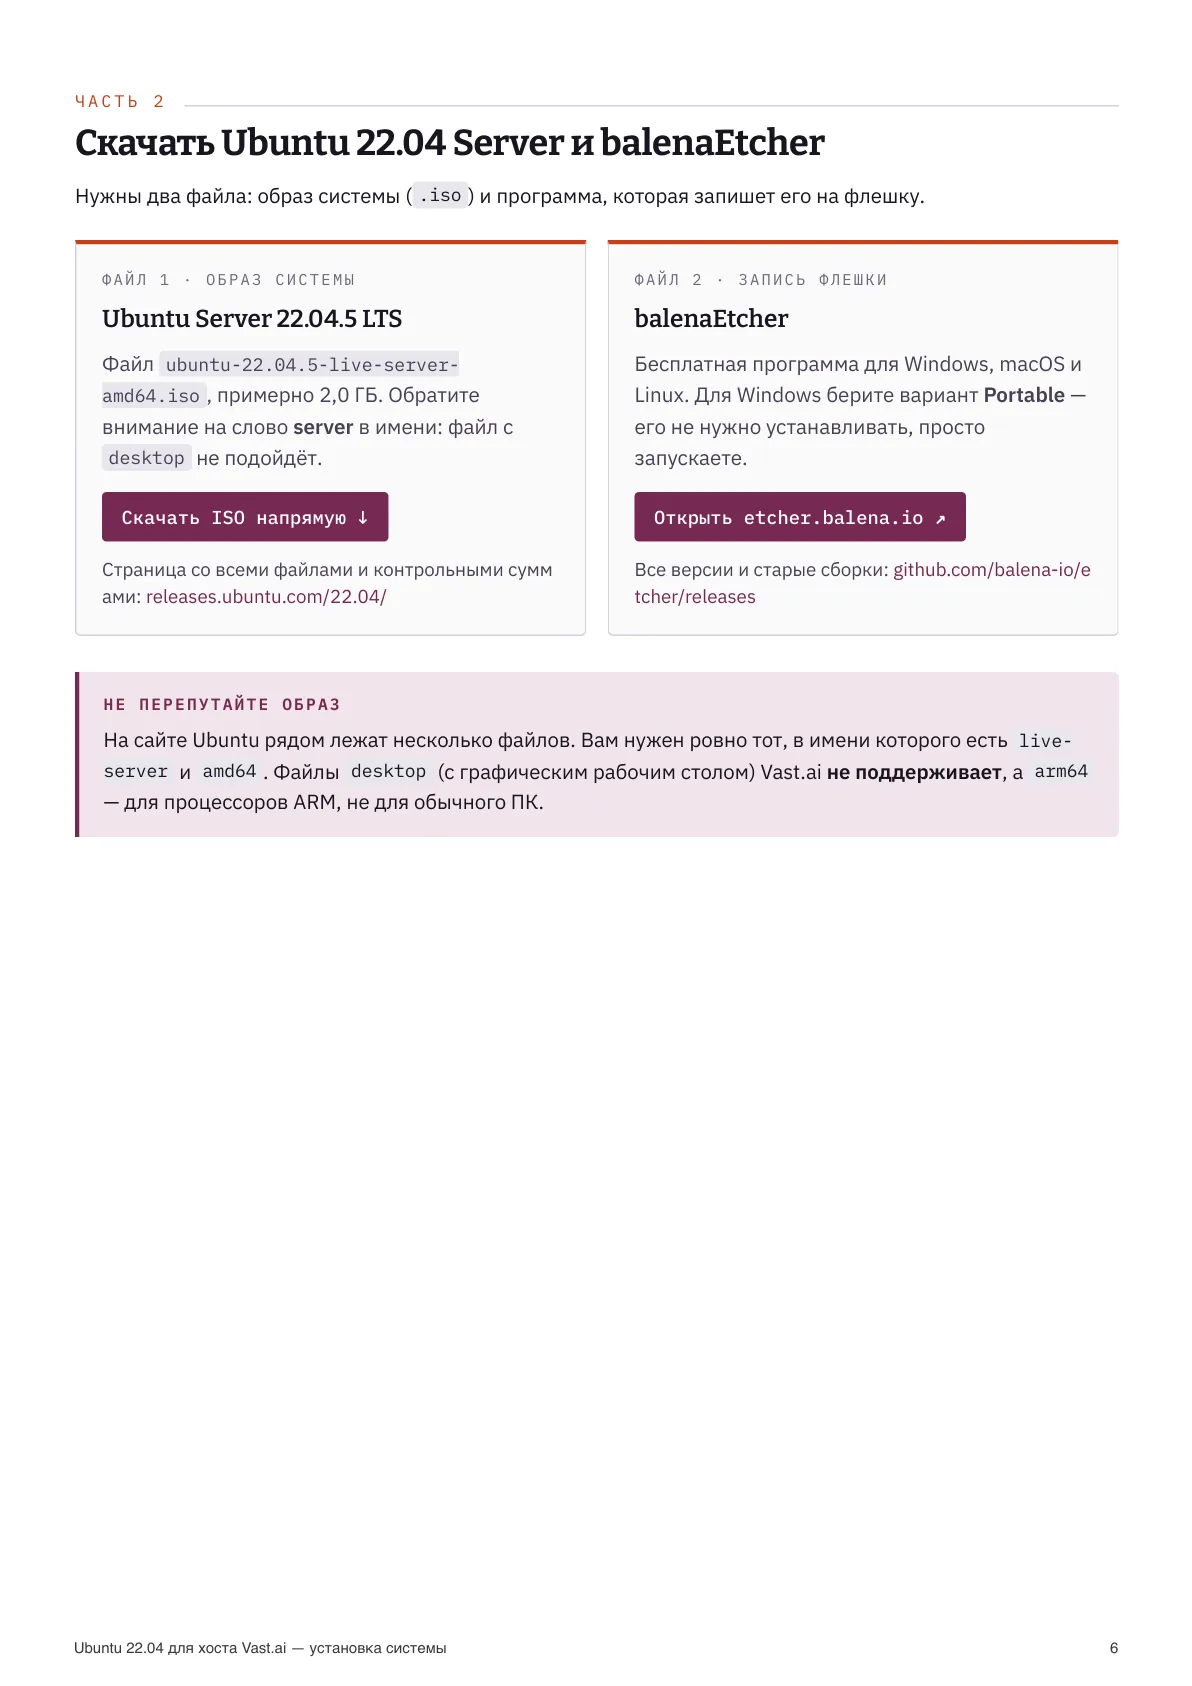
Step 1. Download the image and balenaEtcher
You need two files, download them on another computer. The system image: https://releases.ubuntu.com/22.04/ — the file ubuntu-22.04.5-live-server-amd64.iso, about 2 GB. It must have live-server and amd64 in the name; desktop and arm64 files won't work. The USB writer: https://etcher.balena.io — on Windows take the Portable build, no install needed.
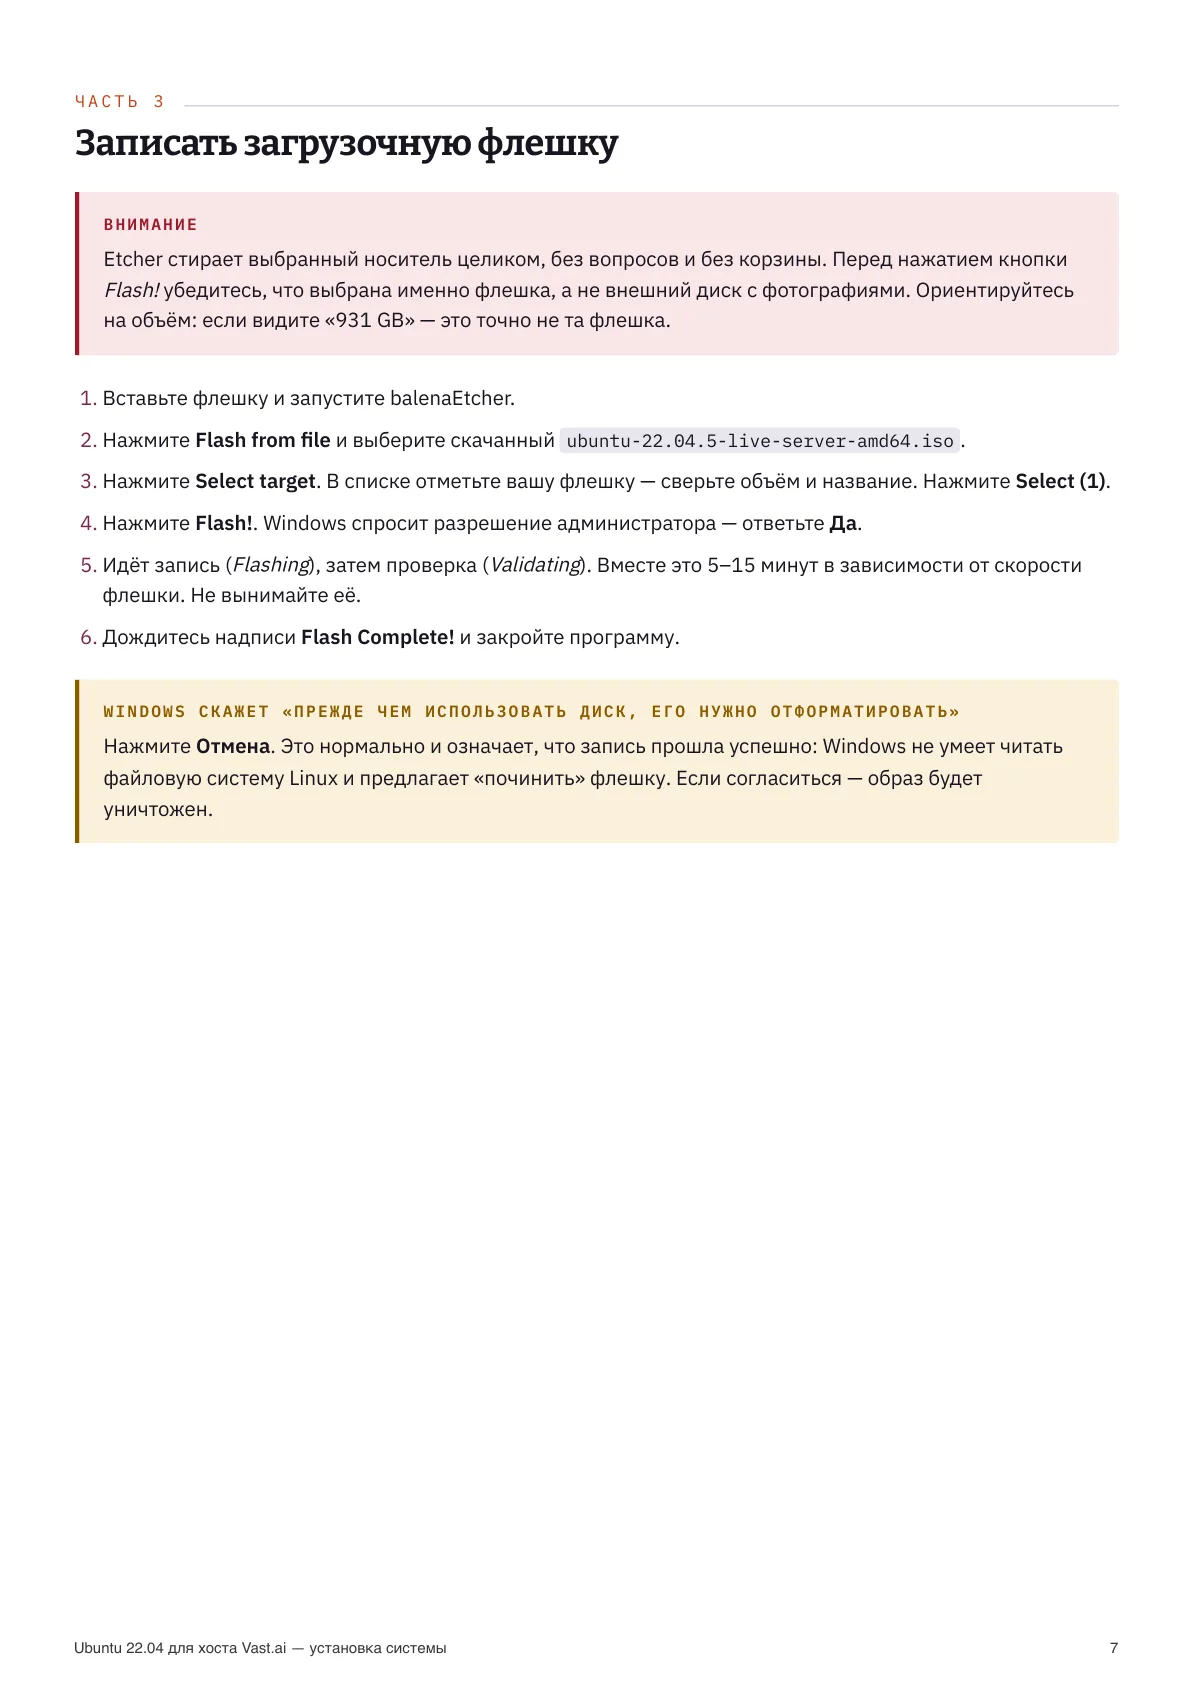
Step 2. Write the boot USB
Etcher wipes the whole target, no recycle bin. Before pressing Flash!, make sure you picked the USB stick, not an external drive. Order: Flash from file → pick the .iso → Select target → choose the stick → Flash!. If Windows offers to "format the disk" afterwards, click Cancel: that's normal — Windows just can't read the Linux filesystem.
Step 3. BIOS/UEFI setup
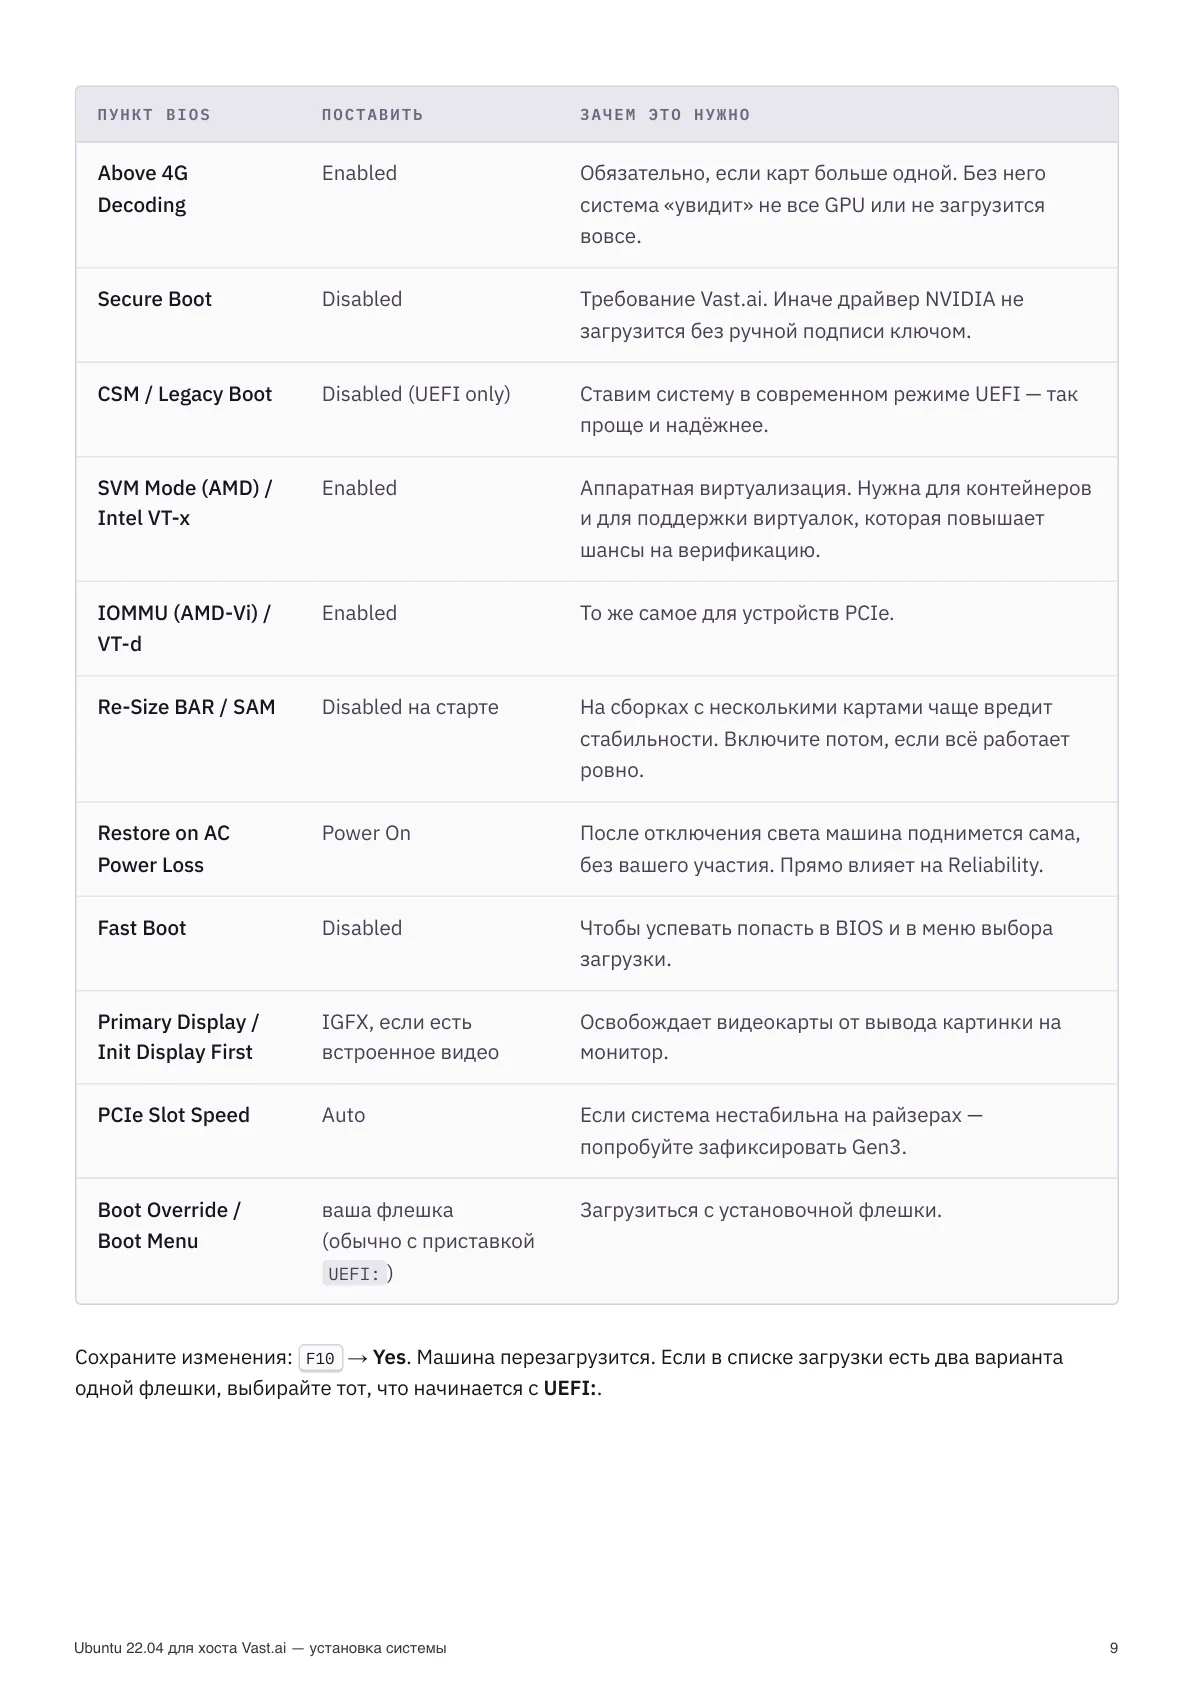
Connect a monitor, keyboard and Ethernet cable, insert the stick and power on, immediately tapping the BIOS key (usually Del, sometimes F2). Menu names vary by board, the meaning is the same. Key items: Above 4G Decoding — Enabled (required with multiple cards), Secure Boot — Disabled (Vast requirement), virtualization SVM/VT-x and IOMMU/VT-d — Enabled, Restore on AC Power Loss — Power On (the machine comes back by itself after an outage).
Step 4. Installer: boot and language
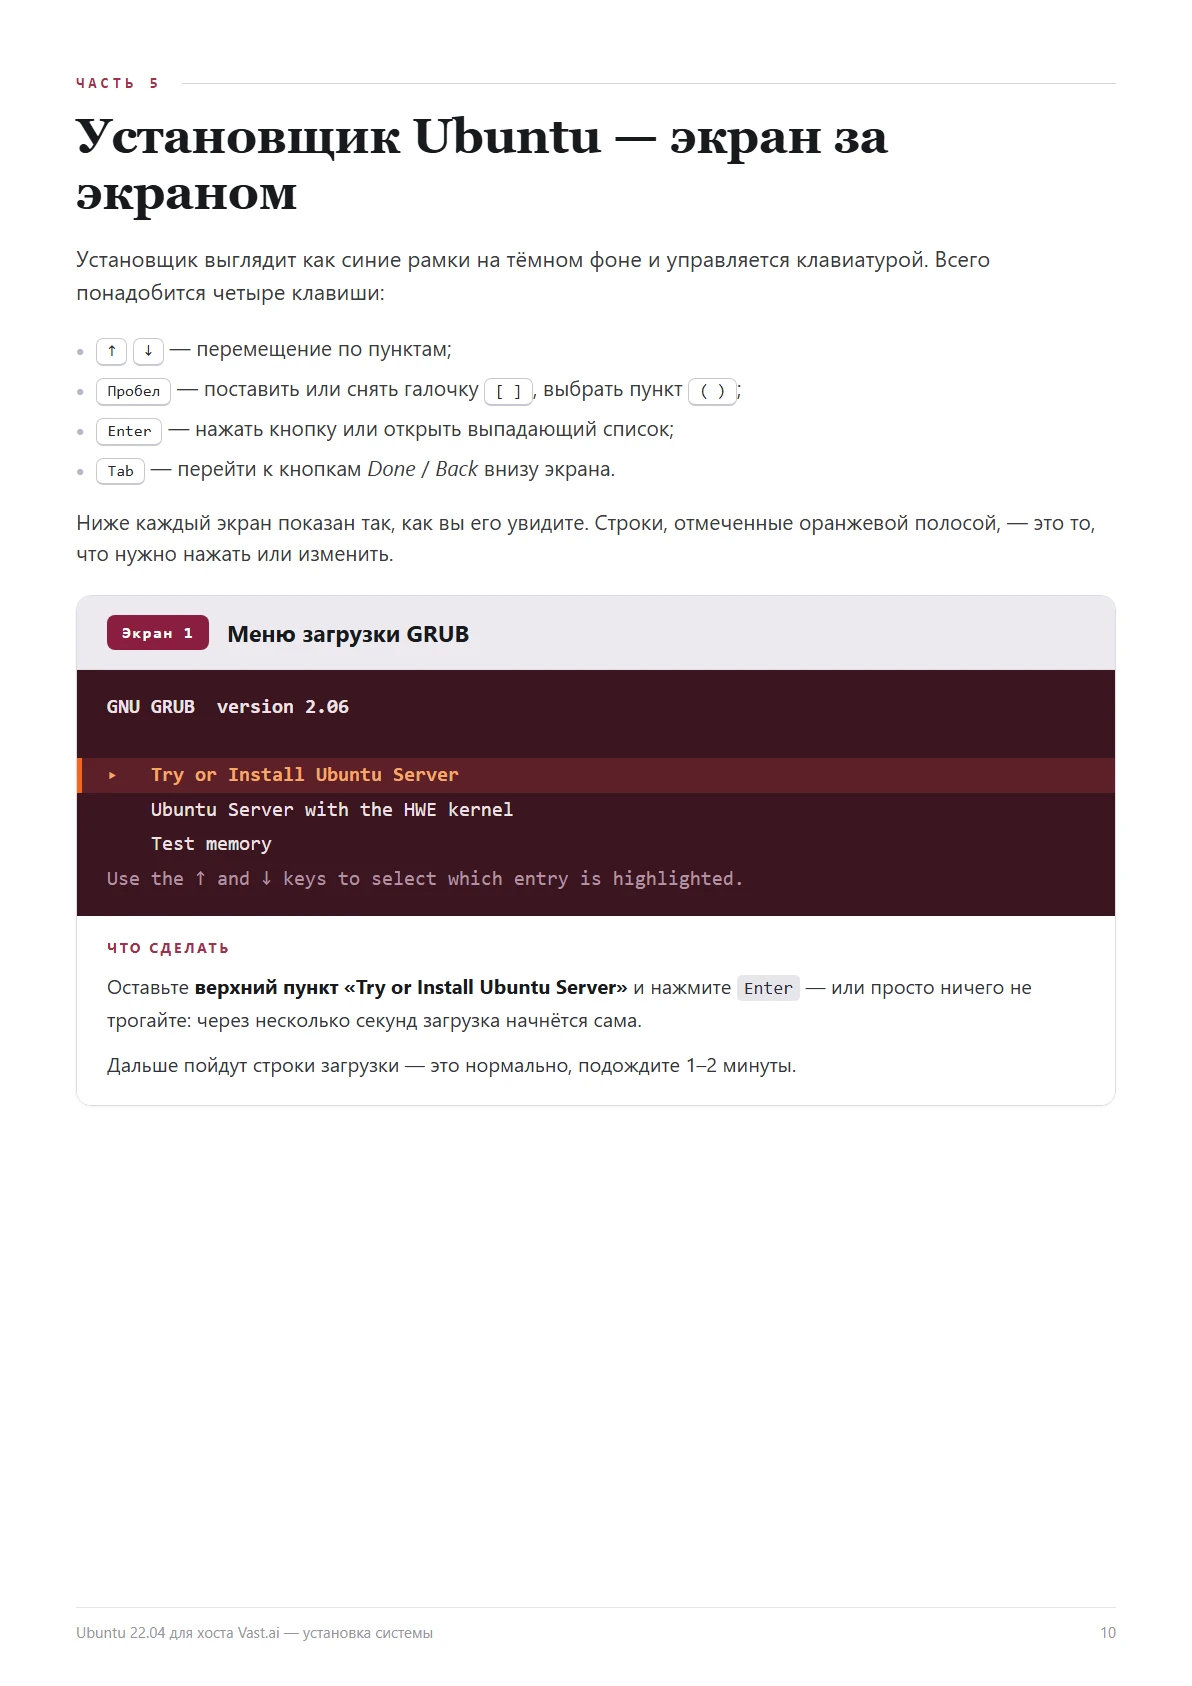
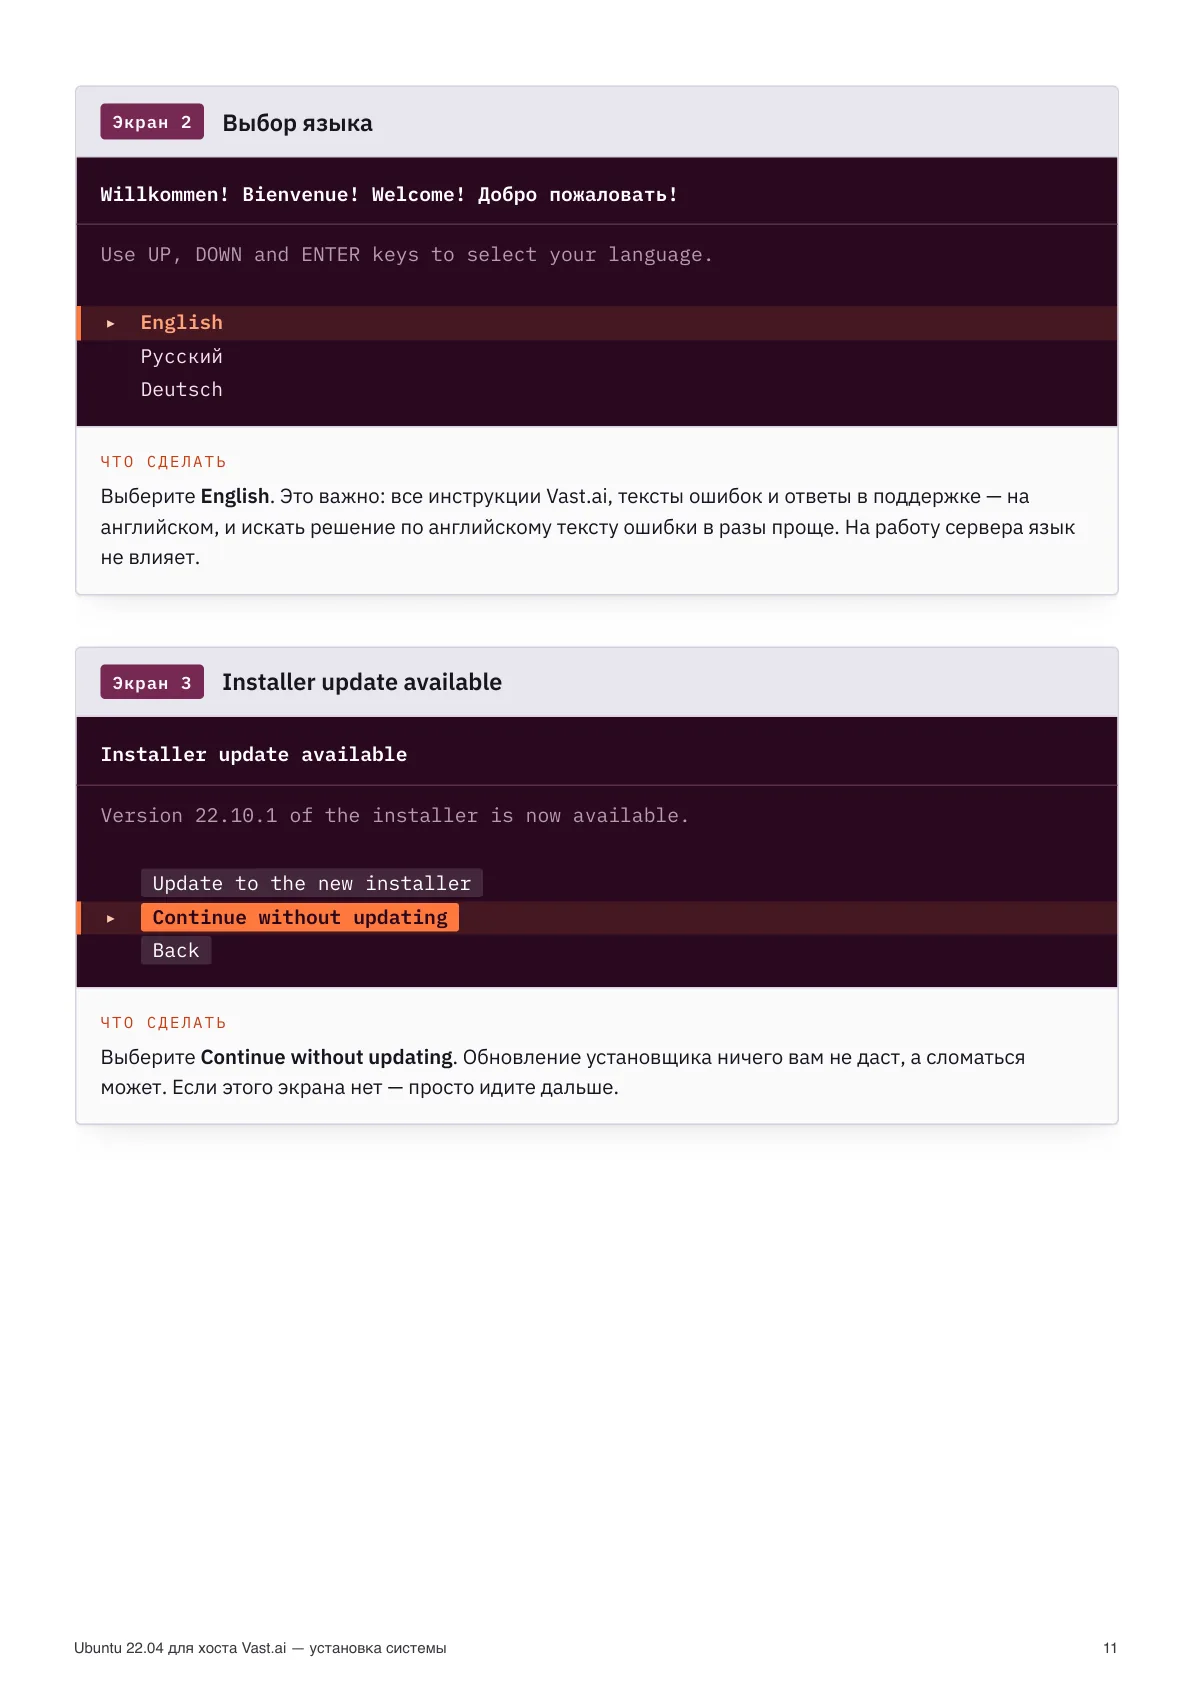
In the GRUB menu keep the top entry «Try or Install Ubuntu Server» and press Enter — or just wait, it boots on its own. Keep the UI language and keyboard as English: all Vast docs and error messages are in English, so searching is easier. Don't add a Russian layout or you may fail to type the password at login. Skip the installer update (Continue without updating).
Step 5. Install type and network
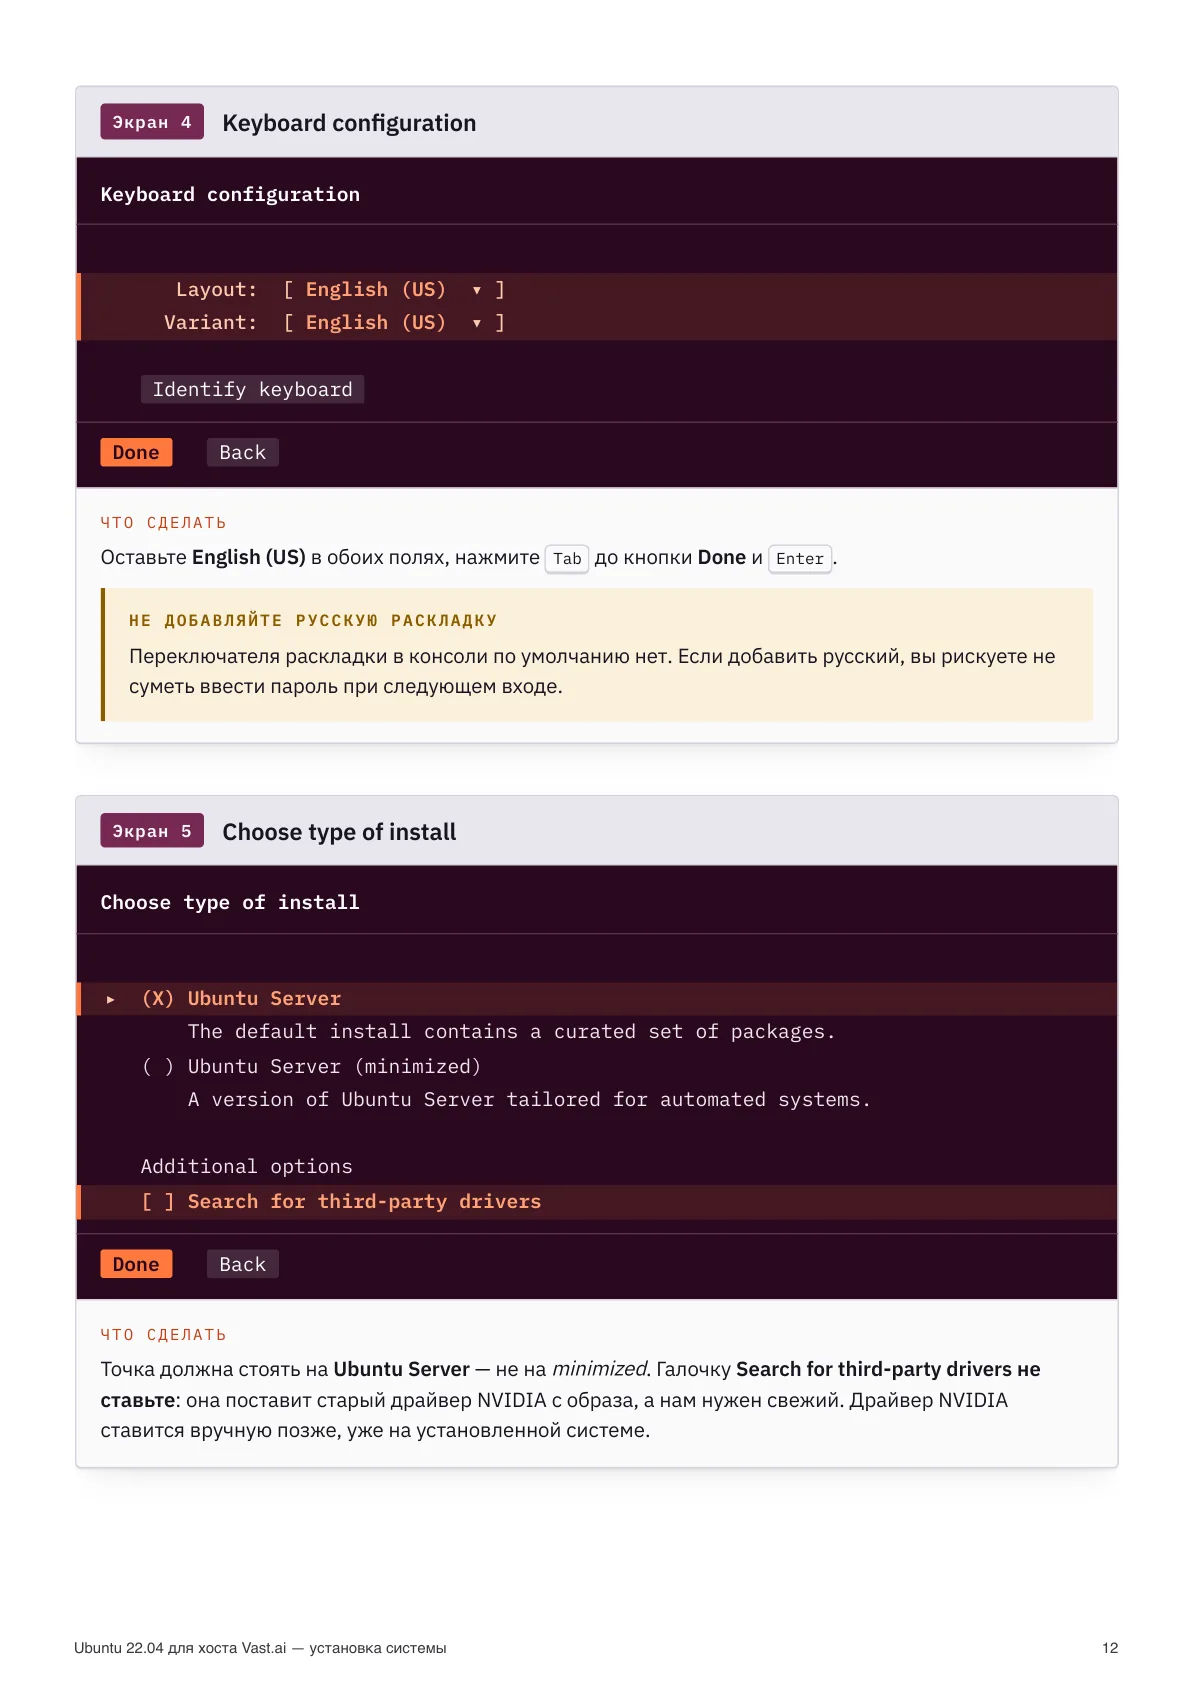
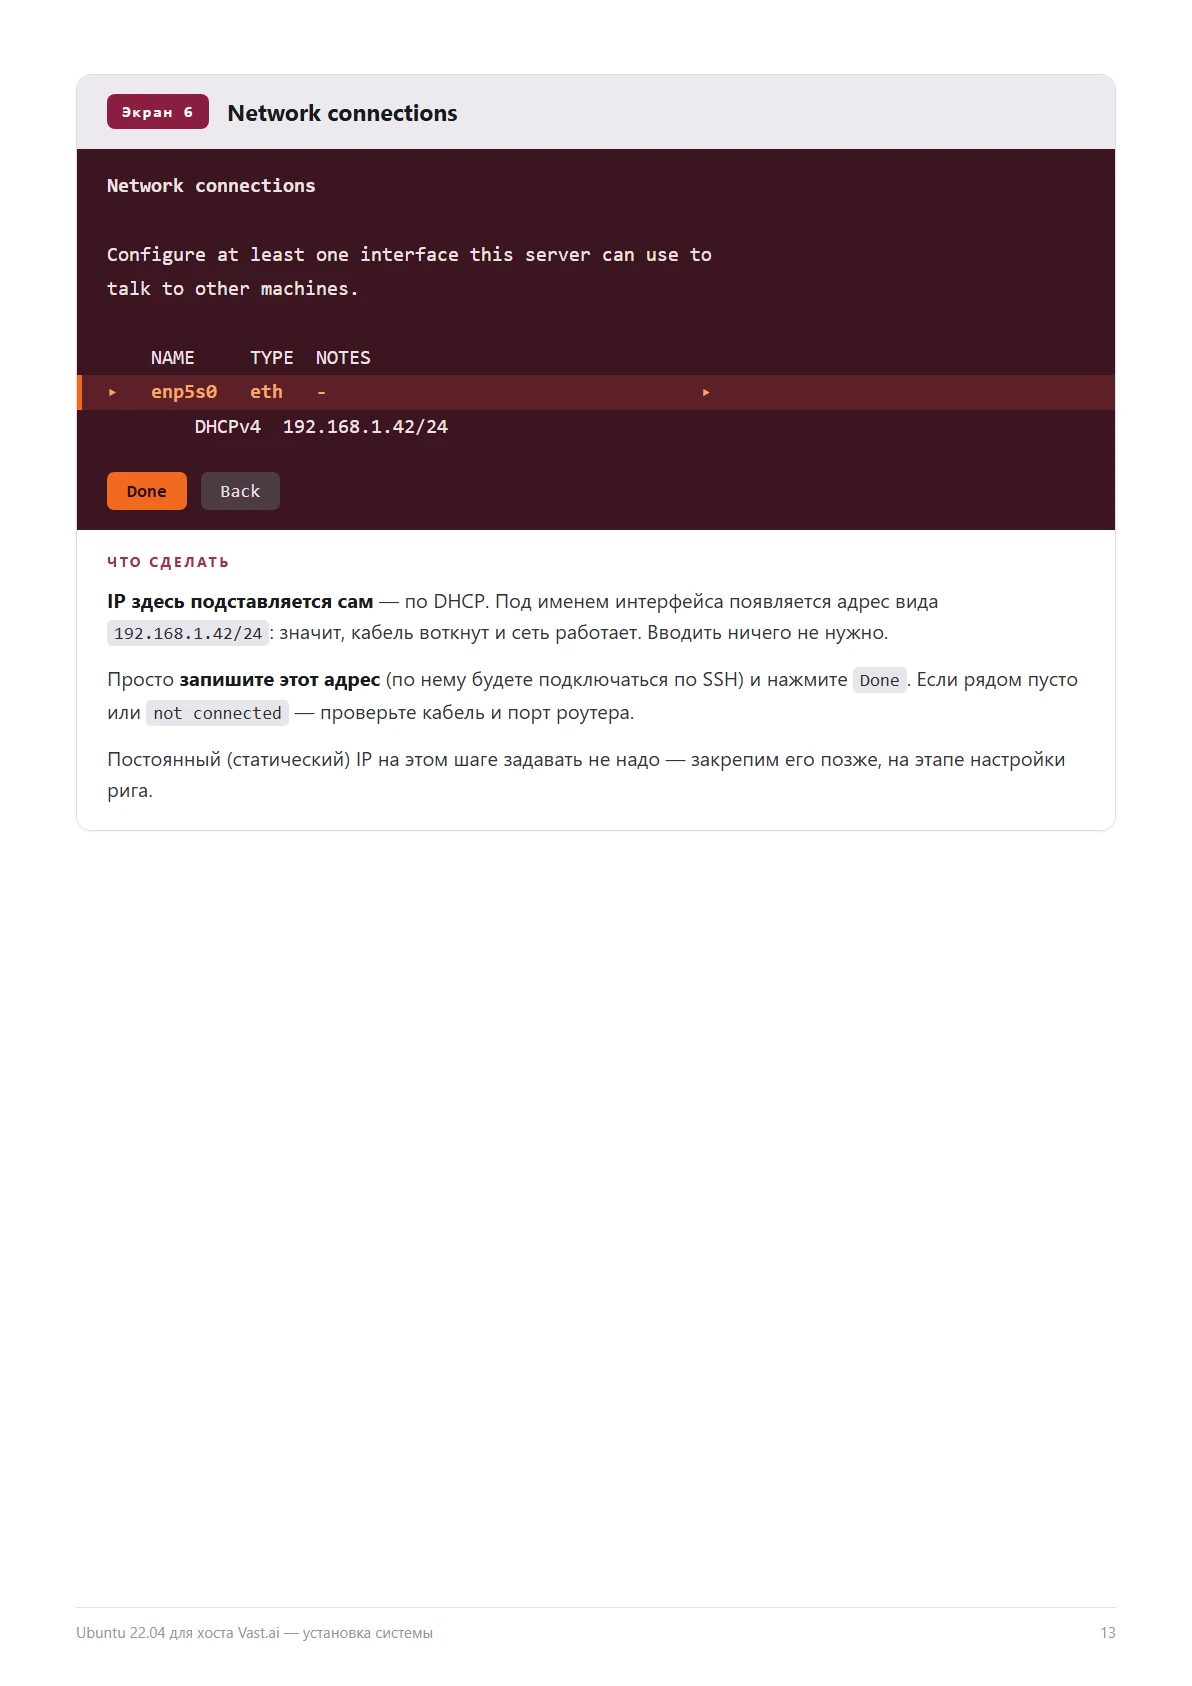
Install type — Ubuntu Server (not minimized). Don't tick «Search for third-party drivers»: it installs an old NVIDIA driver, and we want a fresh one installed manually later. On the network screen you don't type anything: the IP comes automatically over DHCP — wait for an address like 192.168.1.42/24 next to the interface, write it down (you'll connect over SSH with it) and press Done. We'll pin a permanent static address later, during rig setup.
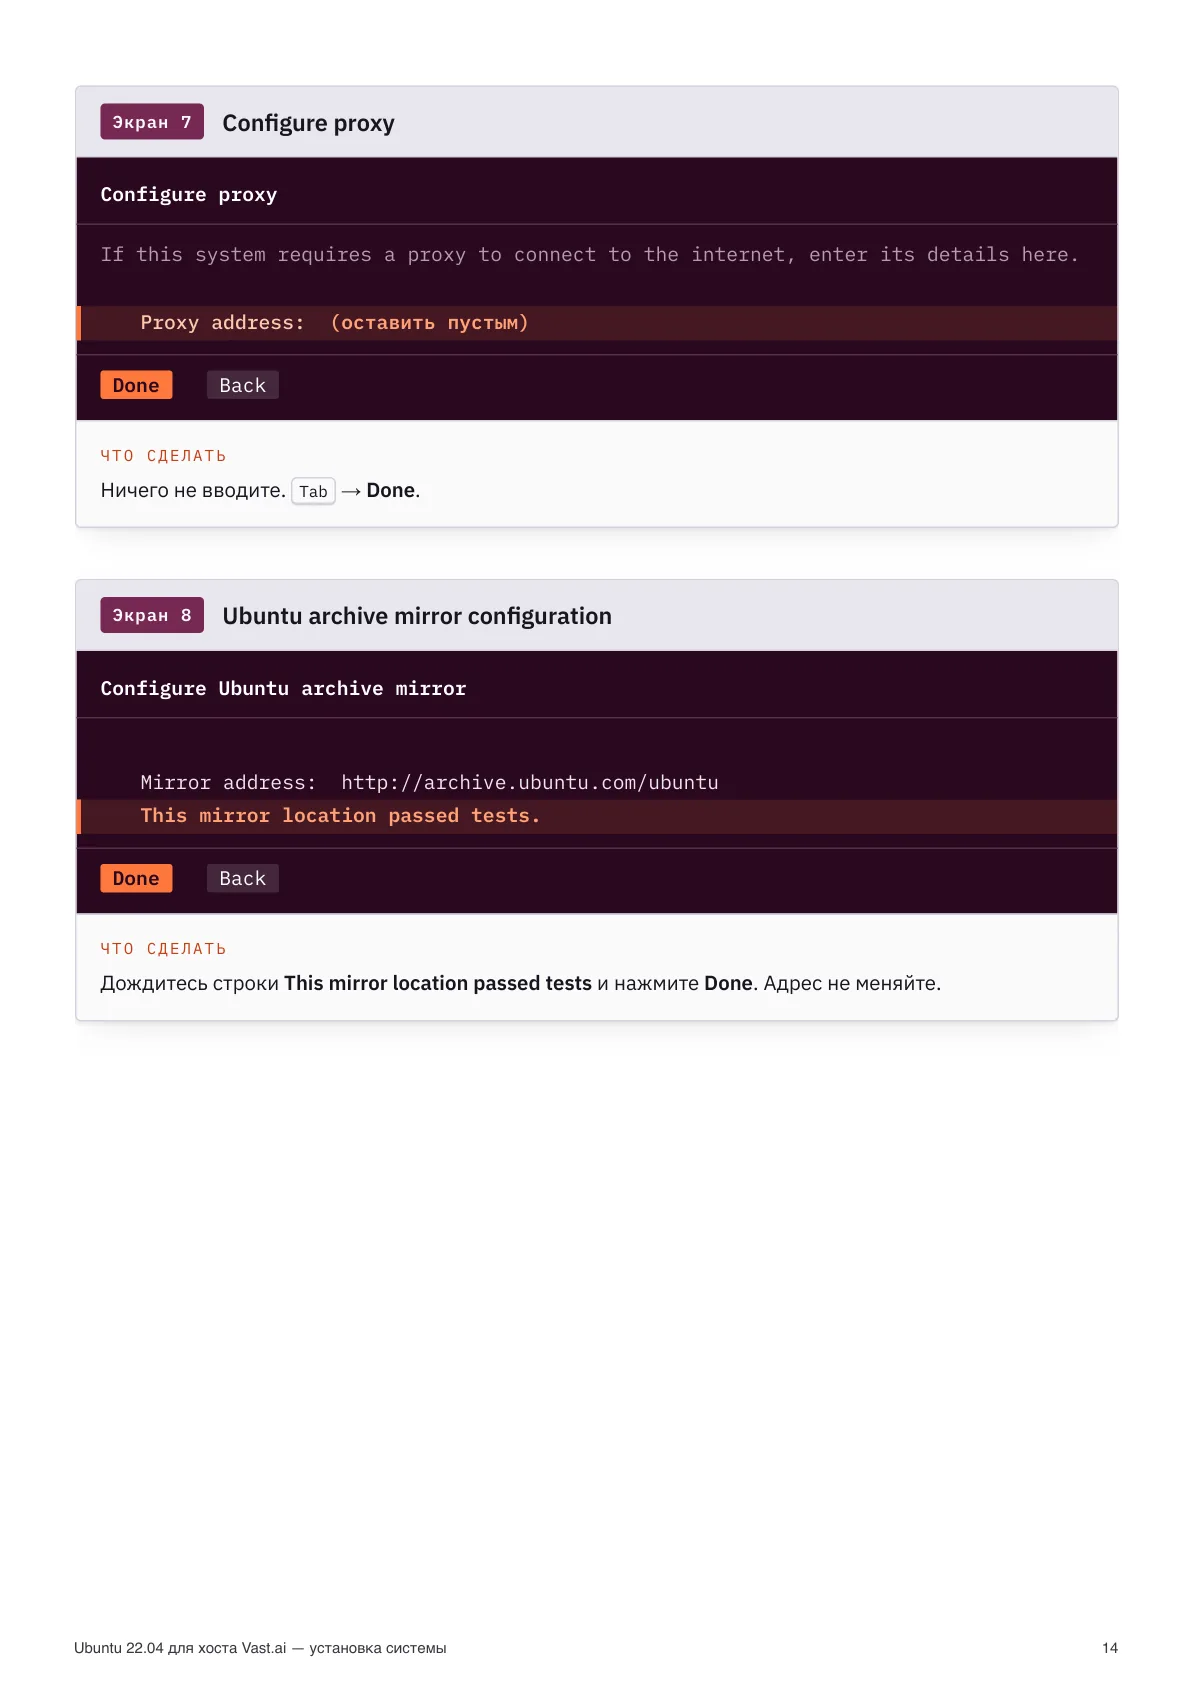
Leave the proxy empty. On the archive mirror screen wait for "This mirror location passed tests" and press Done without changing the address.
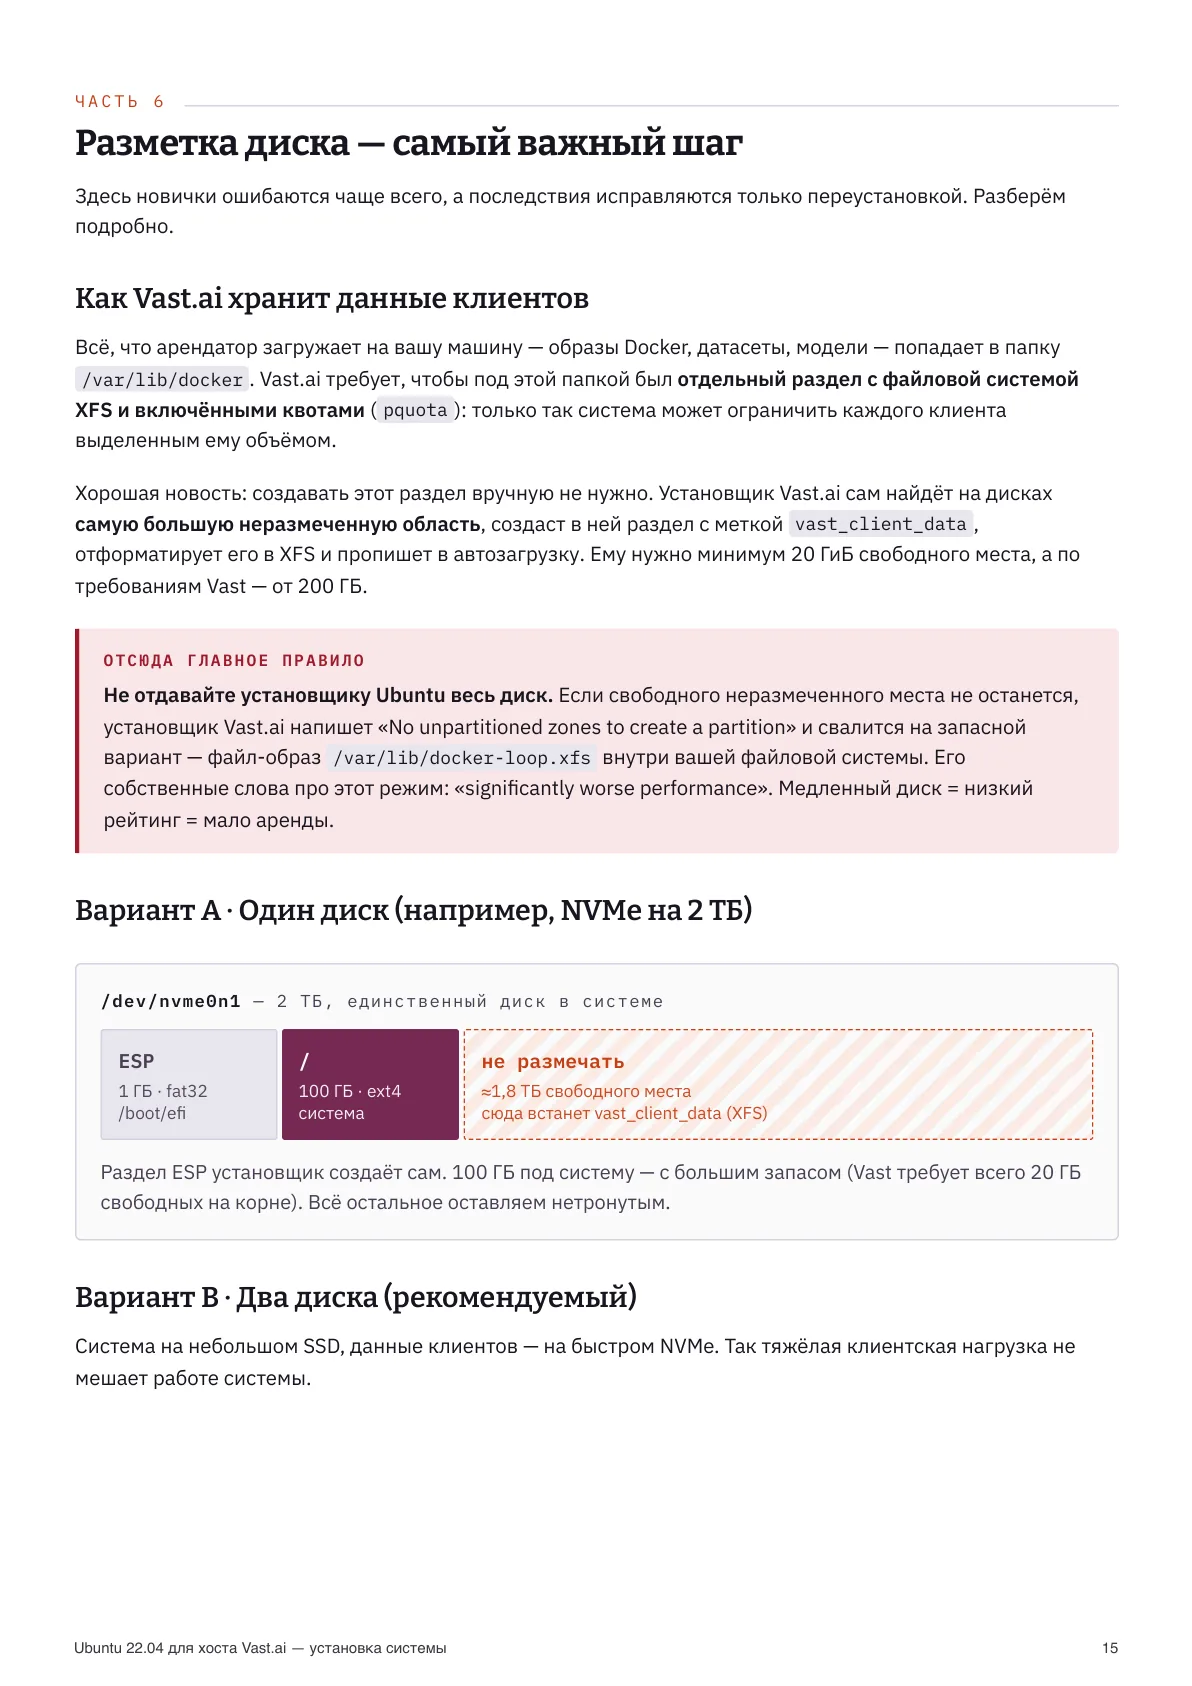
Step 6. Disk partitioning — the most important step
Everything a renter uploads (Docker images, datasets, models) goes to /var/lib/docker. Vast requires a separate XFS partition with quotas under that folder — that's the only way the system caps each client to their allotted space. Good news: you don't create that partition by hand. The Vast installer finds the largest unpartitioned area, creates a vast_client_data XFS partition there and adds it to fstab.
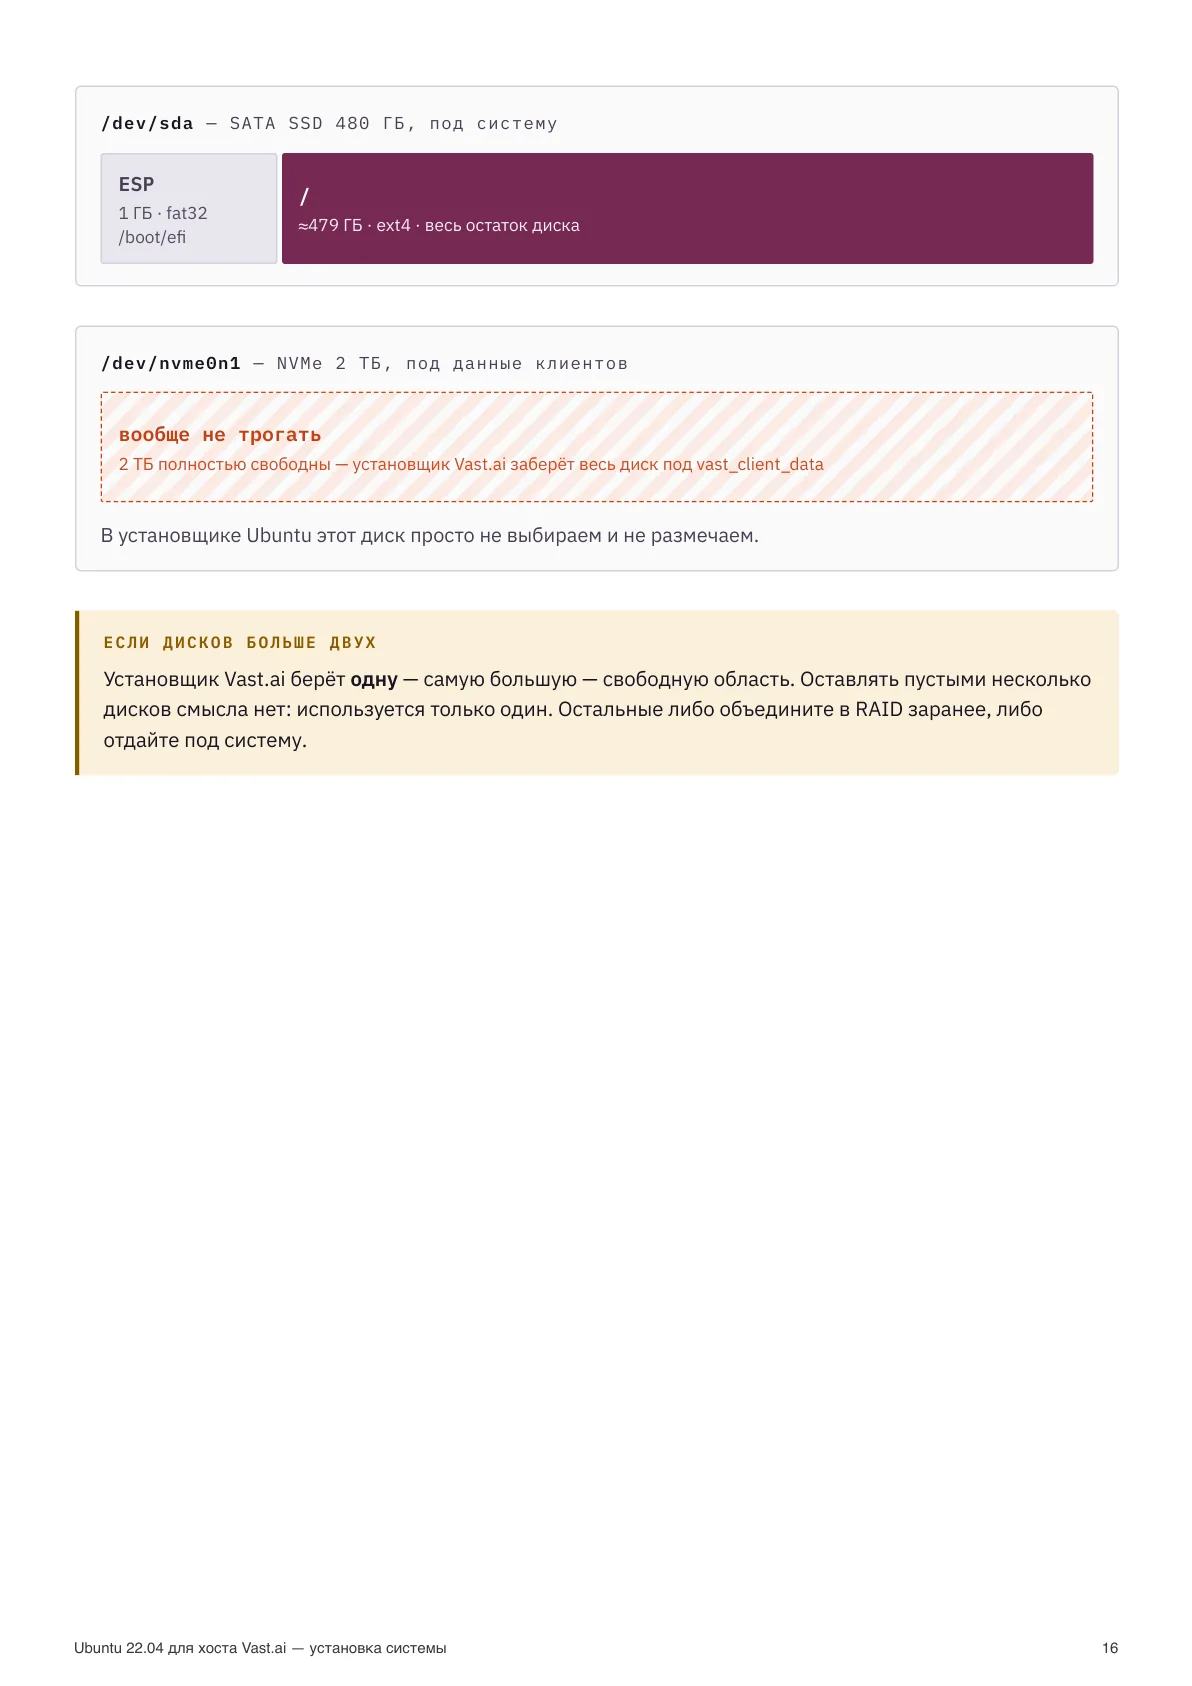
On the Guided storage screen choose Custom storage layout — not "Use an entire disk". Why not entire disk: it gives the whole disk to the system and leaves no free space — exactly the loopback mistake. Why not LVM: the installer doesn't give root the whole group, part of the space is left dangling. Why not LUKS: the machine waits for a keyboard password on every reboot, and a server that can't come up on its own loses Reliability.
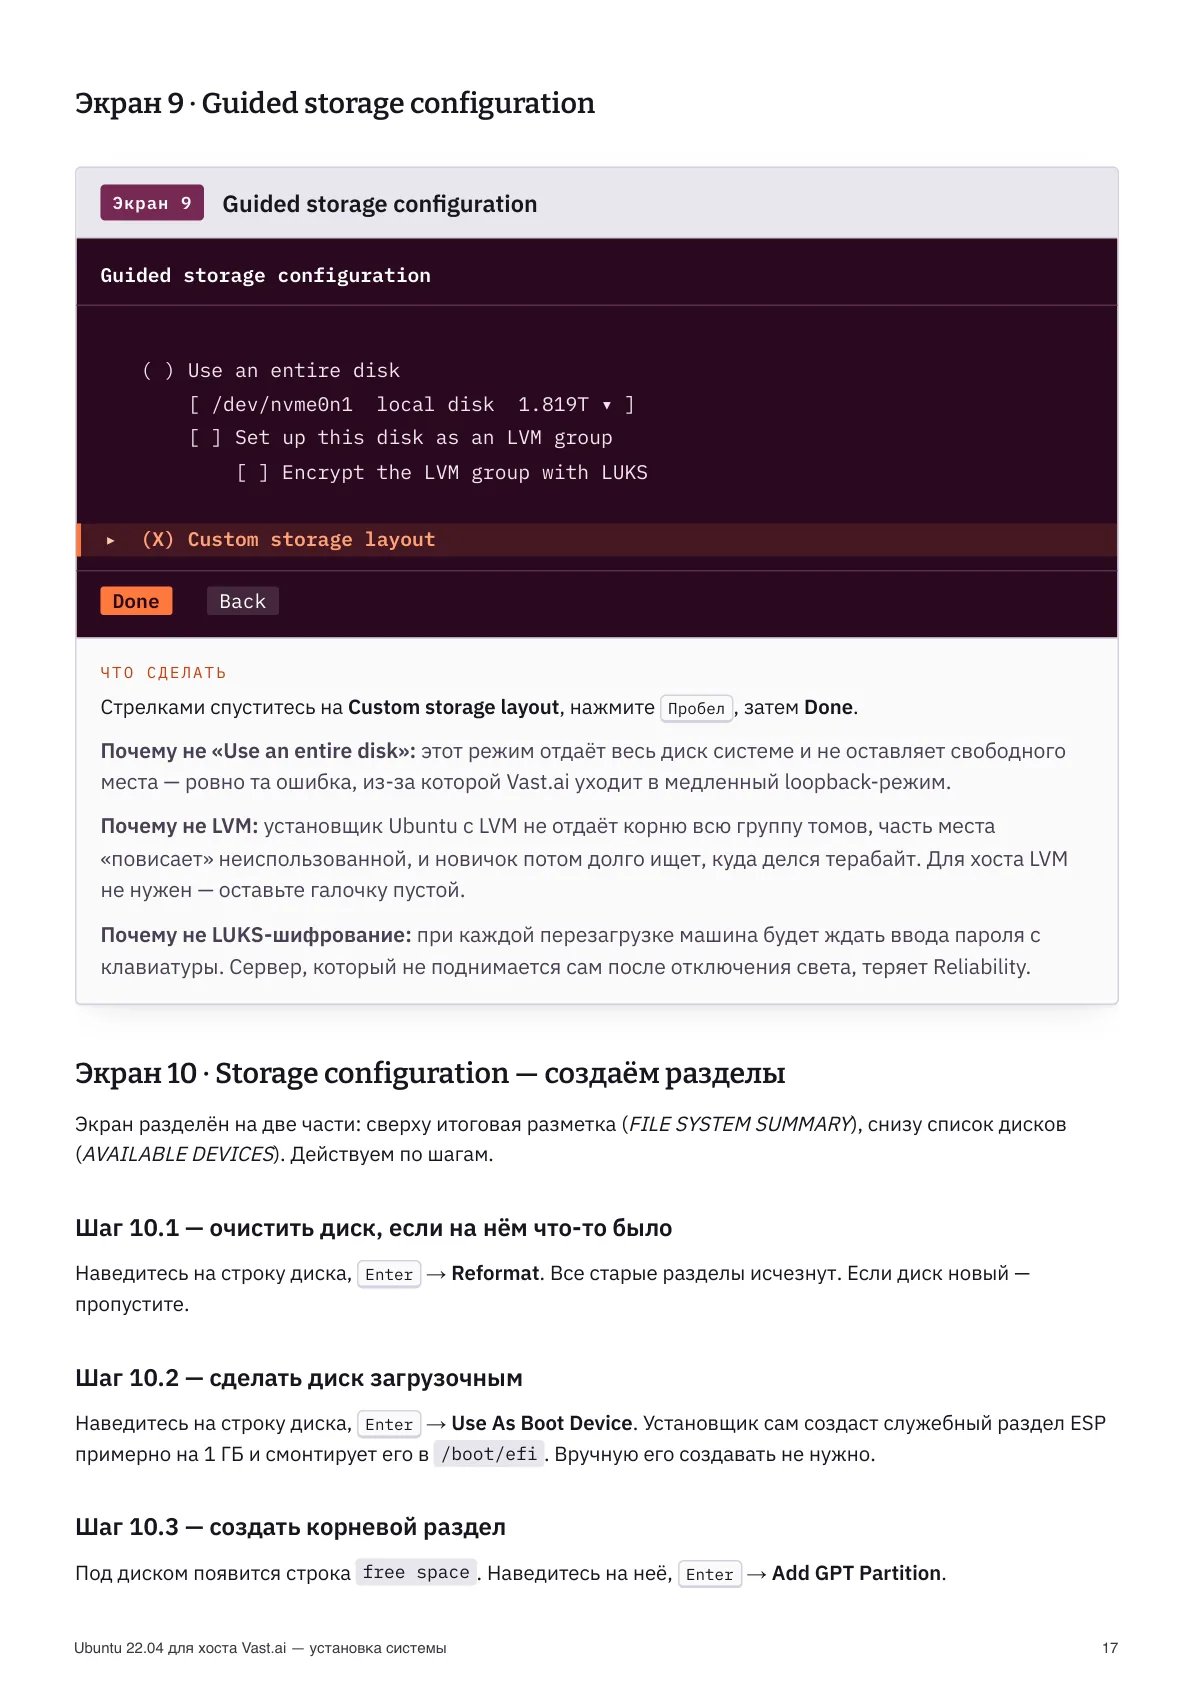
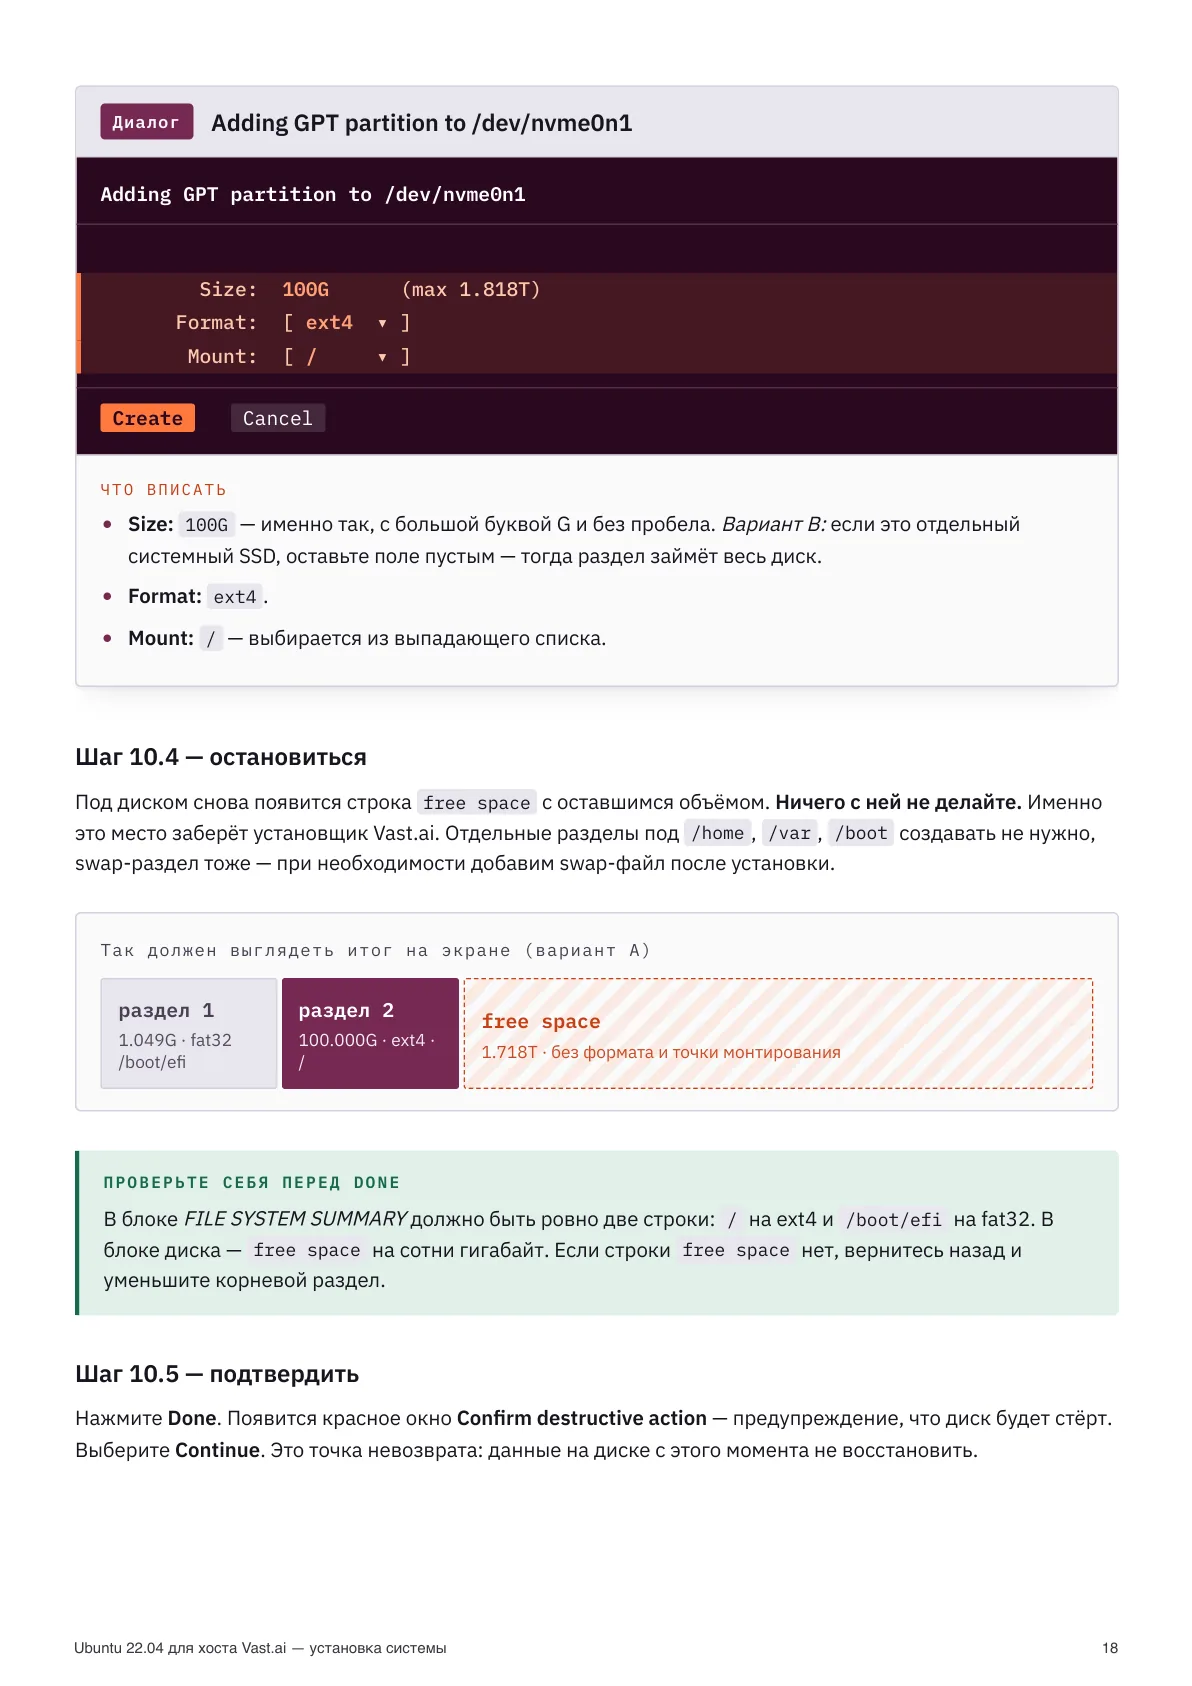
Then step by step: highlight the disk → Enter → Use As Boot Device (the installer creates a ~1 GB ESP at /boot/efi). Then on the free space line → Add GPT Partition → Size 100G, Format ext4, Mount /. And stop: a free space line of hundreds of GB appears again — leave it, that's what the Vast installer will claim. Don't create separate /home, /var or swap partitions (add swap as a file later if needed). Before Done, check: FILE SYSTEM SUMMARY shows exactly / on ext4 and /boot/efi on fat32, with free space below.
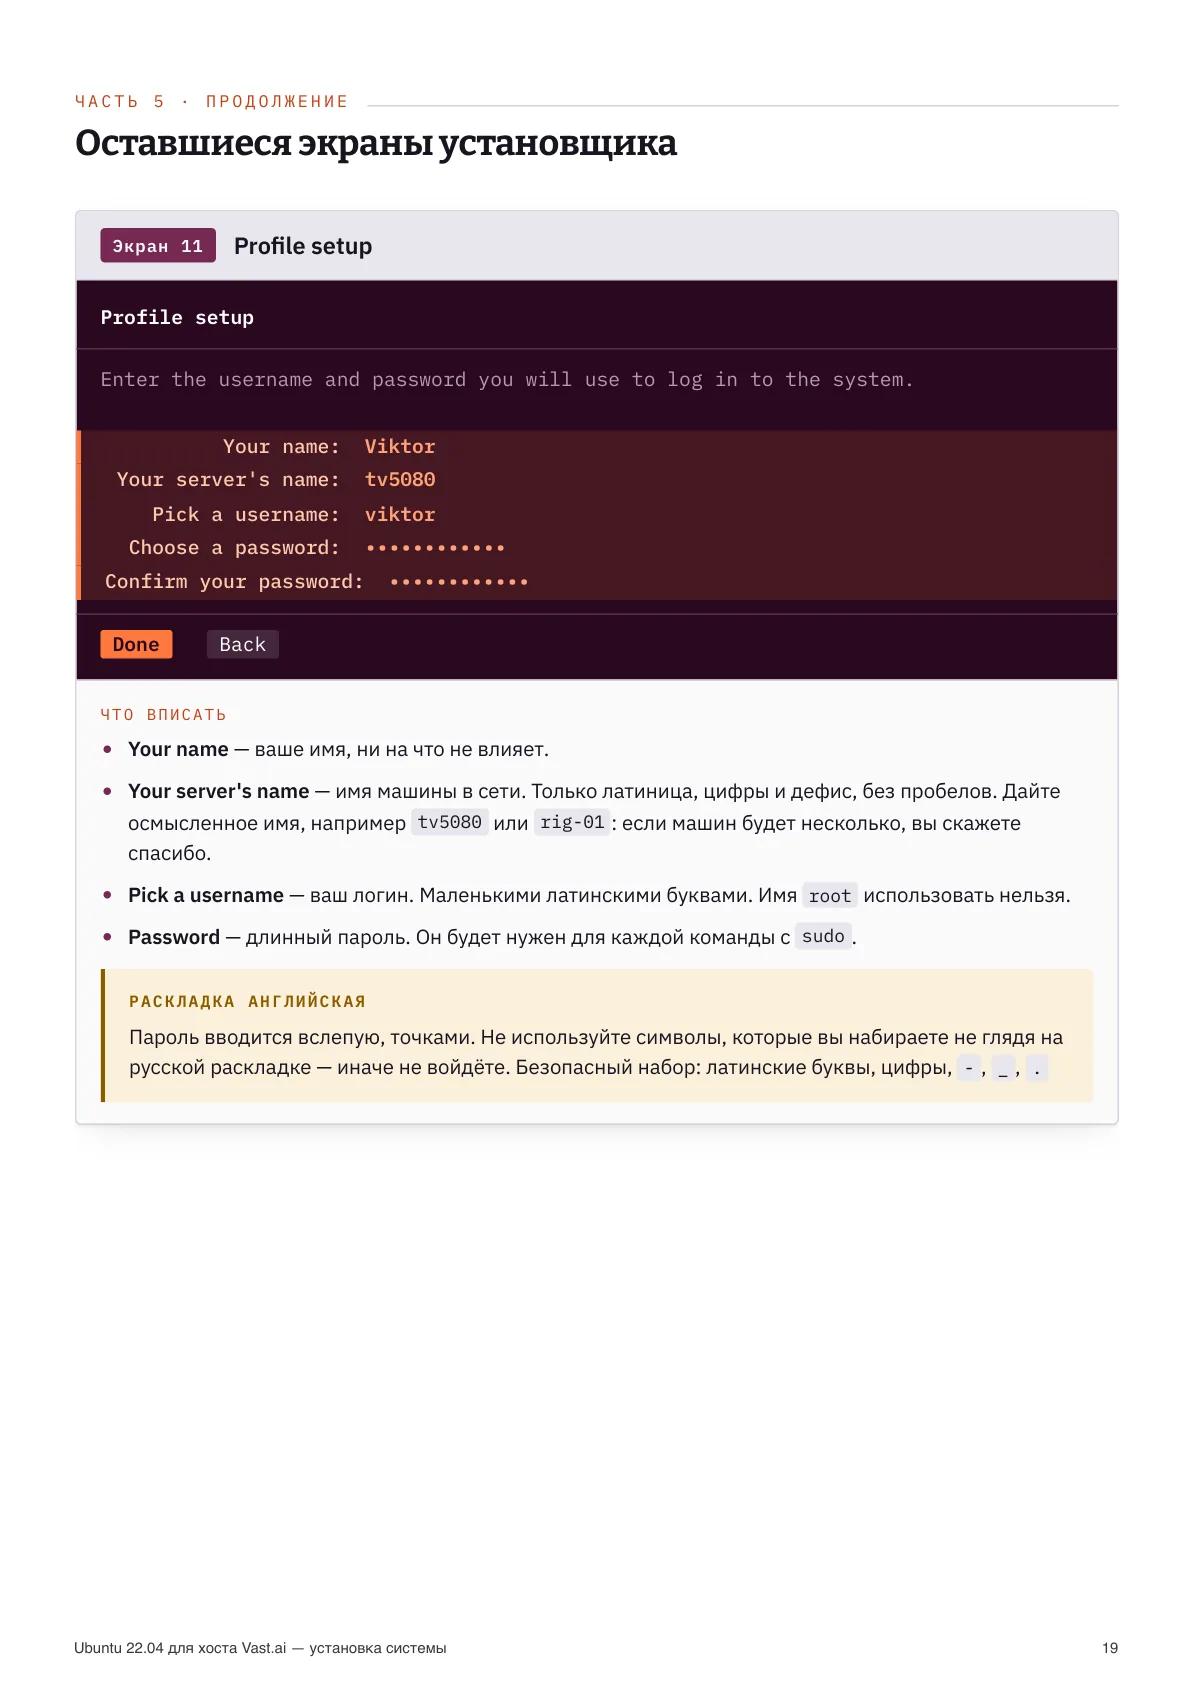
Step 7. Profile, Ubuntu Pro, SSH
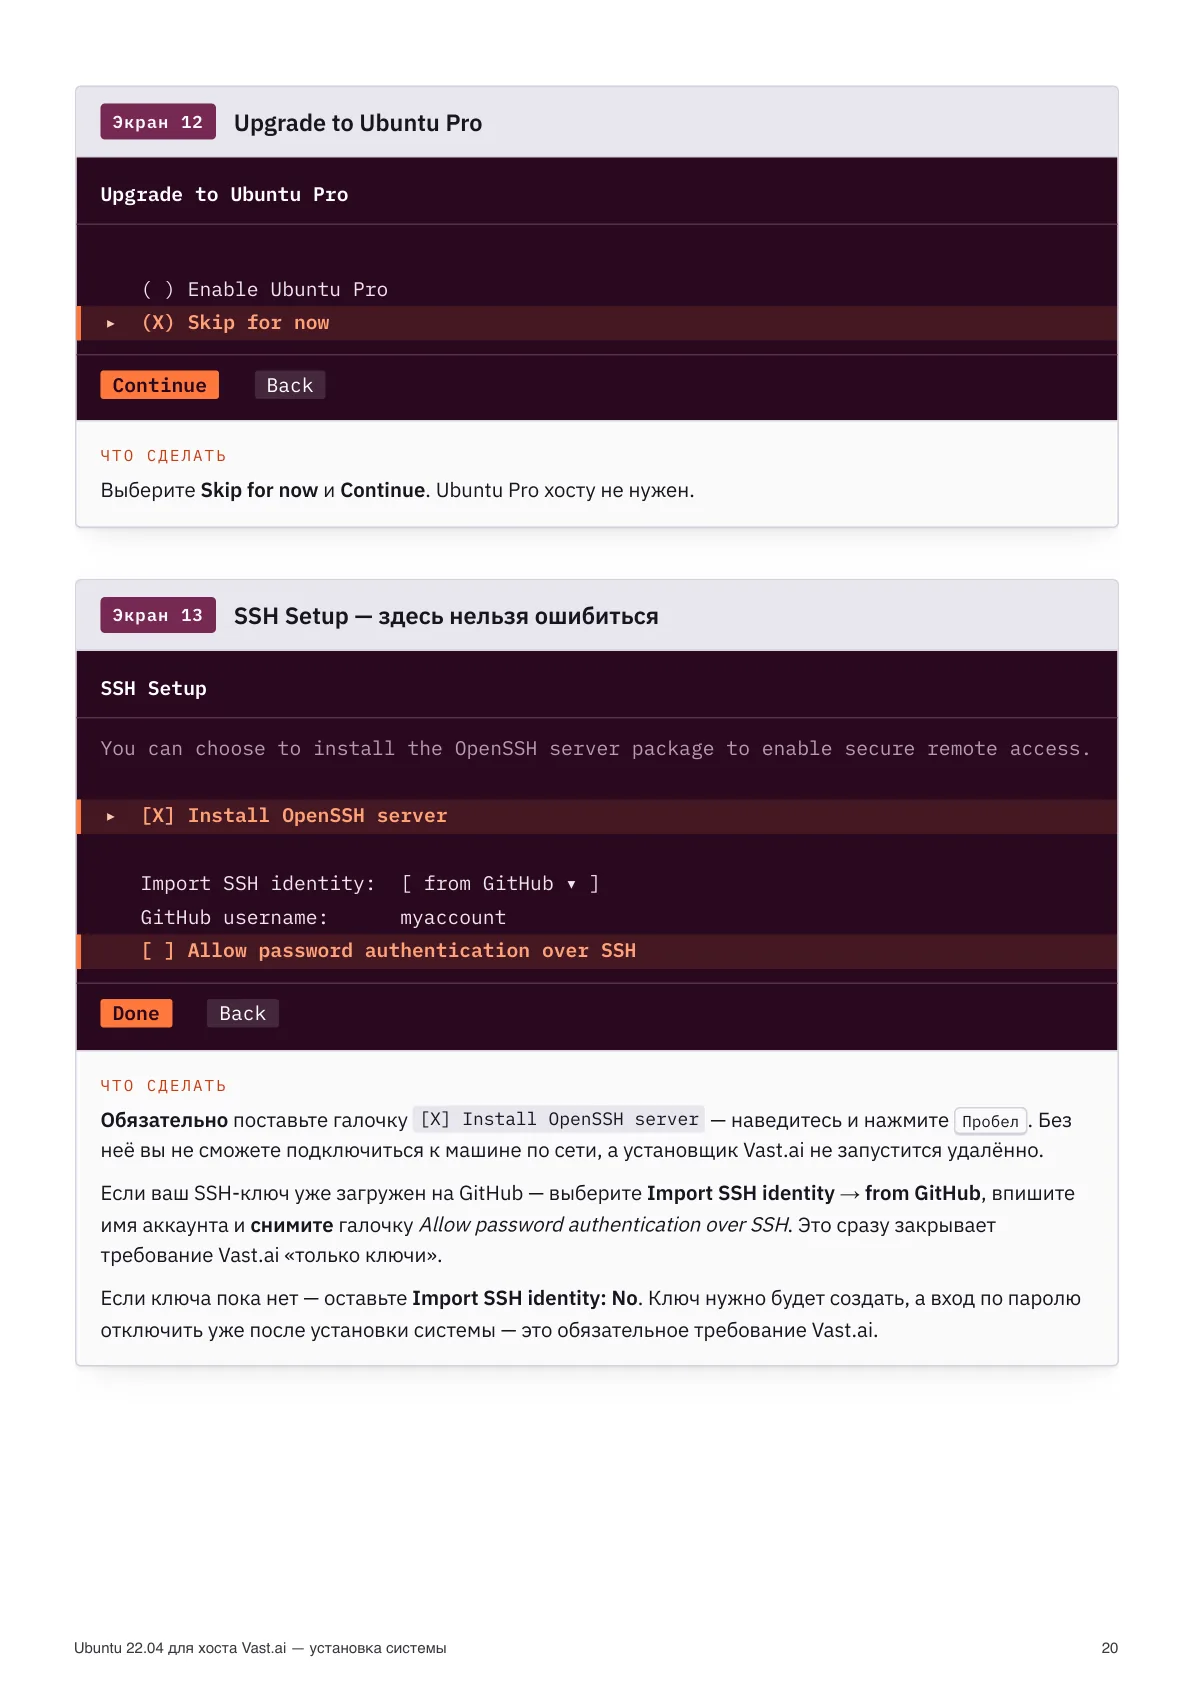
Server name — latin, meaningful (e.g. rig-01): you'll thank yourself with several machines. Username in lowercase latin, root is not allowed. Password long, latin and digits only (typed blind, a Russian layout will trip you up). Ubuntu Pro — Skip for now.
The SSH screen — don't get it wrong. Definitely tick [X] Install OpenSSH server, otherwise no network access and the Vast installer won't run remotely. If your key is already on GitHub — pick Import SSH identity → from GitHub and untick Allow password authentication over SSH: that satisfies Vast's "keys only" immediately. No key yet — leave import at No, create the key and disable password login after install (mandatory).
Step 8. Snaps, install and reboot
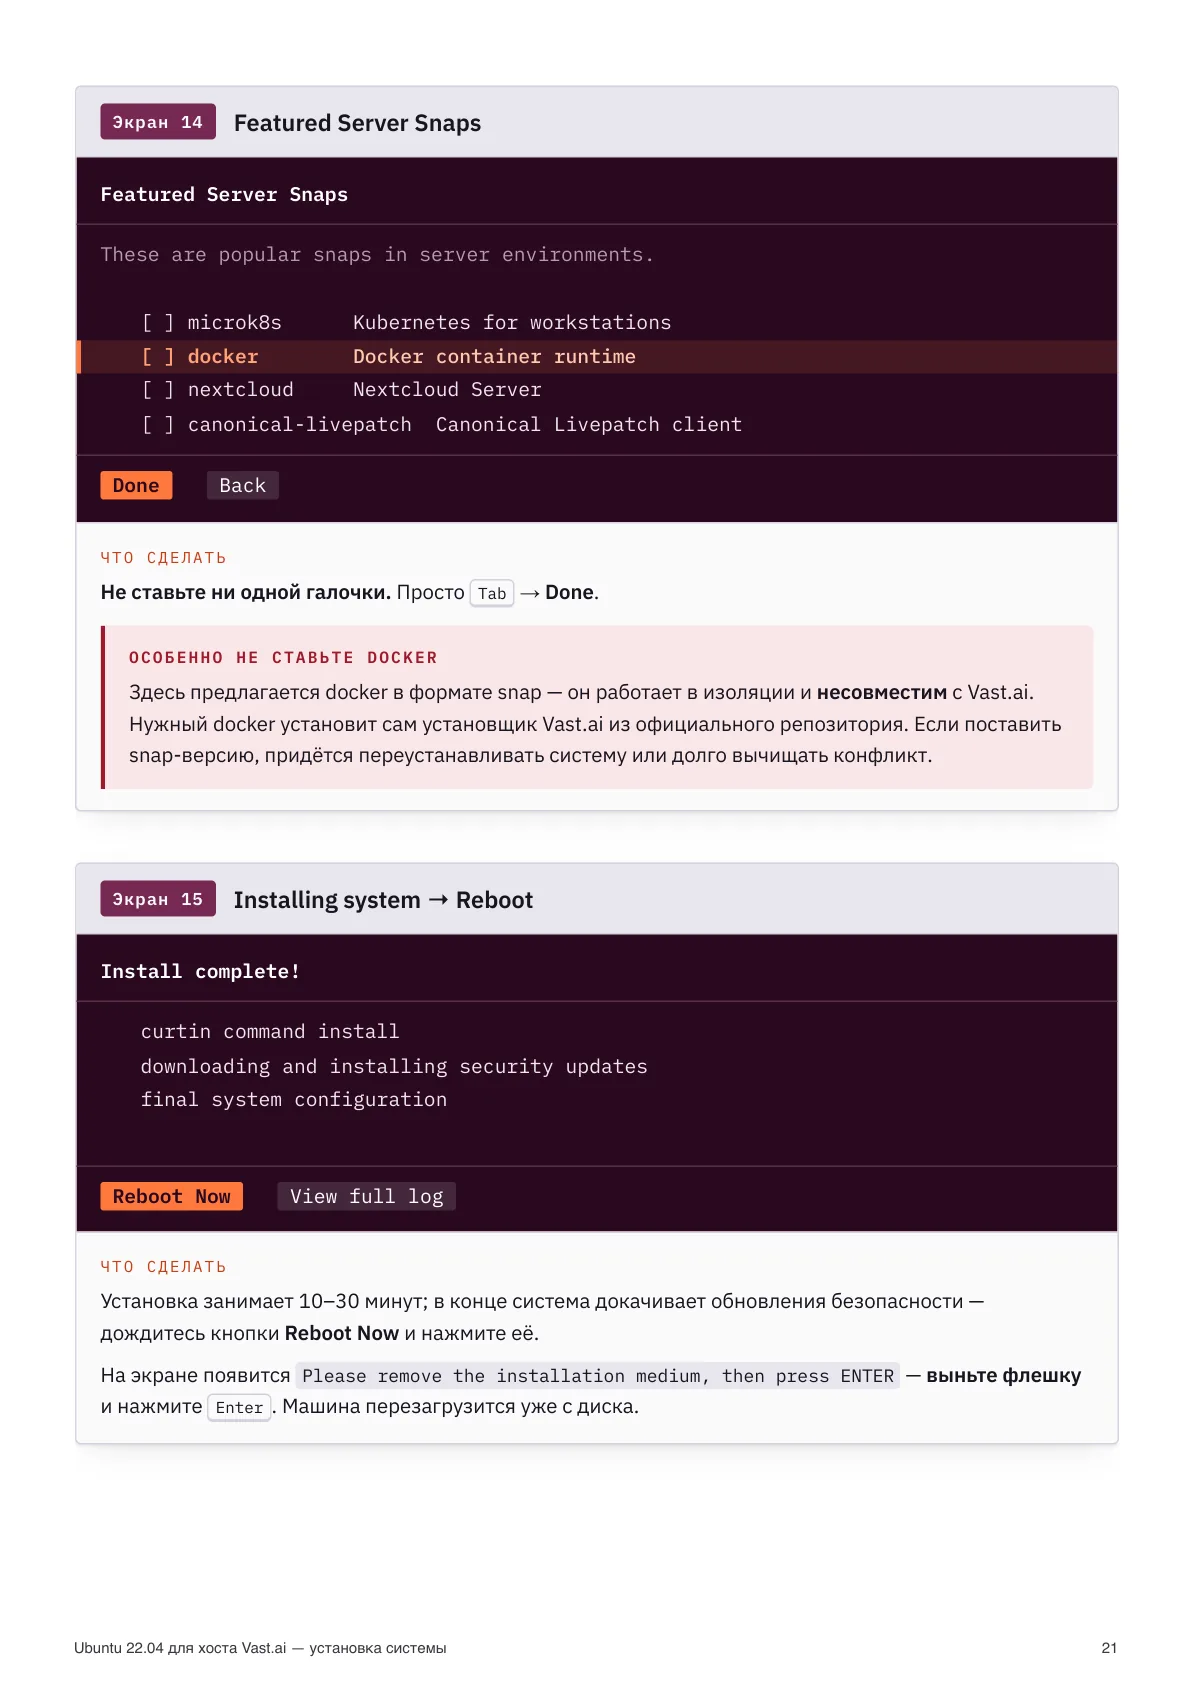
On the Featured Server Snaps screen tick nothing. Especially not docker as a snap — it runs isolated and is incompatible with Vast; the right Docker is installed by the Vast installer from the official repo. Then the system installs (10–30 min) and pulls security updates; wait for Reboot Now, remove the stick and press Enter.
Done. What's next
Ubuntu is installed. Next comes the host itself: the NVIDIA driver, disabling auto-updates, SSH keys, installing the Vast.ai host software and forwarding ports on the router. The path to earnings is covered in our articles and the paid server-setup guide.
Sources checked against: Vast.ai minimum requirements, the host installer console.vast.ai/install (the free-space logic for vast_client_data comes from it), the Ubuntu 22.04.5 LTS images and balenaEtcher. Screen looks may differ slightly across 22.04 point releases — the meaning stays the same.